This capability allows you to modify CATPart geometry in assembly context without modifying the reference CATPart. You can add new bodies/geometries to the associative part even in the absence of the assembly feature (Assembly feature is not saved when the assembly is saved as Structure Exposed in EV5).
Open the AssemblyAssociativity.CATProduct document.
Associativity command results in the creation of a new CATPart instantiated in the assembly, containing a copy obtained by Copy/Paste As Result With Link operation of a chosen geometry from all/ customized components of the active assembly. The new CATPart is associative in geometry and in structure with the assembly.
-
Double-click Sprocket Product (Sprocket Product.1) in the specification tree to activate it.
-
Click Associativity
 in the Assembly Features toolbar. The
Assembly Part Association dialog box appears.
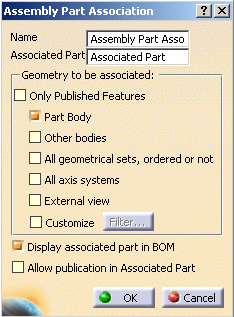
- The Part Body (or Main Body)
- Other bodies
- All Geometrical Sets, ordered or not
- All Axis Systems
- The External View
- Any combinations of the above elements using the Customize option. This option offers the ability to precisely select the bodies to copy for each selected part.
-
The Part Body option is selected by default for the Geometry to be associated. Click OK.
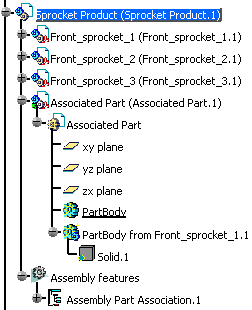
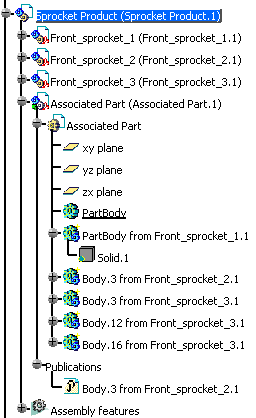
A node Associated Part (Associated Part.1) is created in the specification tree under activated sub-product node. In this node, the geometry is copied and pasted using As Result with Link operation from Front_sprocket_1. You can see that no secondary bodies are available from Front_sprocket_2 and Front_sprocket_3 in this node.
-
A link generated by copying and pasting using the As Result With Link option is not created in associated part in case of associativity of CATShape.
-
When Display associated part in BOM option is selected, the associated part is displayed in the BOM.
Associativity with PRC Context
|
Add to Associated Part
This command allows you to add bodies from existing/new source parts in the product into the associated Part and maintains their associativity.
The Add To Associated Part command does not change the geometries already associated to the part.
-
Click Add To Associated Part
 in the Assembly Features
toolbar. The
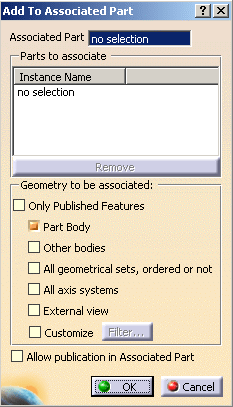
Add To Associated Part
dialog box appears. It adds geometry
from source parts to any CATPart.
-
Select Associated Part (Associated Part.1) in the Associated Part field.
-
Click in the Instance Name field and select Front_sprocket_1.1, Front_sprocket_2.1 and Front_sprocket_3.1 in the in the Parts to associate frame.
- You can select a part or a product. In case of a product, all the parts under the product are added to the list.
- To remove source part from the list, select the source part in the list and click Remove.
-
Select Part Body and Other bodies options in the Geometry to be associated area.
In case of Customize option for the selection of geometry, the Parts to associate field is disabled.
Allow Publication in Associative Part
The Allow publication in Associative Part option allows publication of pasted geometries in the associated part in case they are published in the source part.
-
Select Allow publication in Associated Part option.
-
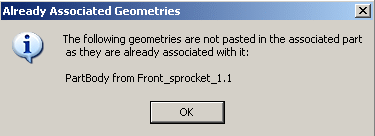
Click OK. The Already Associated Geometries message box appears.
-
Click OK. All secondary bodies from Front_sprocket_2 and Front_sprocket_3 are added in the Associated Part node. The publication of Part Body from Front_sprocket_2 is also copied.
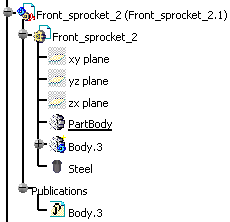
Only Published Features
When the Only Published Features option is selected, only published geometries from the set of selected geometry options or custom list of geometries are imported in the associated part. This is a separate independent option.
- A PartBody or Body is imported, only if published.
- Any feature under geometrical set or ordered geometrical set is imported only if it is published. So a geometrical set or ordered geometrical set is imported only if it has at least one published feature.
- When the geometry option is Customize, you can select publications. In this case, PartBody/ Body/ Geometric Set/ Ordered Geometric Set to which that publication belongs is added to the list.
An availability and default value of this option in creation as well as in edition phase depends on the setting of Restrict external selection with link to published elements option (Tools > Options > Infrastructure > Part Infrastructure > General > External References).
- When this setting is unlocked and is not selected, the Only Published Features option is available only for edition and by default the check box is cleared in the dialog box.
- When this setting is unlocked and selected, then Only Published Features option is disabled and by default the check box is selected in the dialog box.
- When this setting is locked, the Only Published Features option is always disabled and its value is same as the value of the setting.
-
Right-click Sprocket Product (Sprocket Product.1) and select Components > New Part. If a dialog box appears suggesting for the options to define a new origin point for the new part, click No. A Part1 (Part1.1) node is added in the specification tree.
-
Click Add To Associated Part
 .
The
Add To Associated Part dialog box appears.
 -
Select Part1 (Part1.1) in the Associated Part field.
-
Click in the Instance Name field and select Front_sprocket_1.1, Front_sprocket_2.1 and Front_sprocket_3.1.
-
Select the options Only Published Features, Part Body, Other bodies and All geometrical sets, ordered or not in the Geometry to be associated area.
-
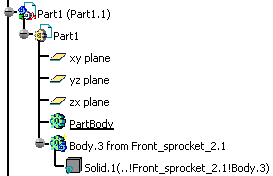
Click OK. You can see that in this case only published body is selected. The rest all selection are ignored.
![]()
