")
|
-
Select File > Save Management.
 |
|
If the
Apply Save to editor scope only
option is selected, only the documents of the current editor
will be listed in the Save Management dialog box and
thus, will be impacted by the save. In this scenario, the option
is cleared and all the documents that are open are listed,
whatever the current editor. |
|
Five columns are displayed:
-
The State column indicates the
original state of each currently used document. For instance, if
a document has been modified since last load, the corresponding
state (i.e. "Modified") is displayed in the State
column. The different states you can assign to a document are:
-
New: identifies a newly created
document. You have to select a file name in order to save it.
-
Open: identifies a non-modified document
open in your session.
-
Modified: identifies a document modified
in your session.
-
Modified by synchronization: identifies
a document modified at opening in order to be synchronized with
a modified pointed document.
-
Read Only: identifies a modified and
read-only document. Specify a new name if you want to save the
document.
-
The Name column displays the name
of each document about to be saved.
-
The Location column indicates all documents that are
currently used along with their paths.
-
The Action column enables you to check the actions you
are performing on your documents (save, modification, etc.). Bear
in mind that the State column keeps on displaying the
document original state and do not reflect the actions you
performed.
The different actions that can be displayed are:
-
Open Read Only: identifies a
non-modified, read-only document open in your session.
-
Save: identifies a document that will be
saved.
-
Save Auto: identifies a dependent
document that will be saved.
-
The Access column indicates the access rights for each
document.
|
") |
Modifications made to a CATPart do not propagate to its
CATProduct and have no impact on the state of the CATProduct.
Therefore, a "dirty" CATPart is identified as "Modified" whereas
the CATProduct it is linked to is identified as "Open".
For more information, refer to "About Modified Status when
Editing a CATProduct" in the Version 5 - Product Structure
User's Guide. |
|
The Enable independent saves check box
lets you save documents independently regardless of any existing
links between files, i.e. dependent documents will not be
automatically saved when the document they are linked to is
saved. |
-
Select the files to be saved.
|
At this point, you can add a suffix and/or a
prefix to the name of the documents you are going to save. To do
so, enter the character string to be added to each file name in
the Pattern Name box.
The character * is used as a wildcard to replace the
file name and you can set the following pattern values:
-
yyy* (where yyy is
the character string) means that the names of the selected
files will be prefixed with yyy, e.g.
yyyMyPart.CATPart.
-
*xxx (where xxx is
the character string) means that the names of the selected
files will be suffixed with xxx, e.g.
MyPartxxx.CATPart.
-
yyy*xxx means that the names of
the selected files will be prefixed and suffixed
respectively with yyy and xxx, e.g.
yyyMyPartxxx.CATPart.
The last pattern used is stored in
preference files (which are identified by the suffix
*.CATPreferences, and are created in the same location as
settings, referenced by the CATUserSettingPath variable).
You can add a prefix or a suffix to one document
only or to multiple documents. To select multiple documents, you
can use one of the following methods:
-
Heterogeneous selection by pressing Ctrl
-
Continuous selection by pressing
Shift+Ctrl
-
Computed selection by right-clicking a document
in the list then select one of these two contextual commands:
-
Select All Pointed to select all
the impacted pointed documents. In that case, all documents
links are taken into account, especially contextual ones,
which means that the resulting graph can be larger than the
object's product tree.
-
Product Tree to select the entire
depending product tree. In that case, neither contextual
links (for design in context) nor relational links (from part
to part) are taken into account but only structure links (for
the product structure's composition).
However, note that if the document you select when using this
command is not a CATProduct, then the selection is not
extended. Note that shape representations other than CATParts
(cgr, model, CATShapes, etc.) are also included in the
resulting selection.
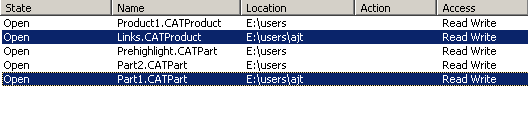
In the example below, right-clicking
Links.CATProduct and choosing Select All Pointed
automatically selects Part1.CATPart which is referenced by
Links.CATProduct:
|
|
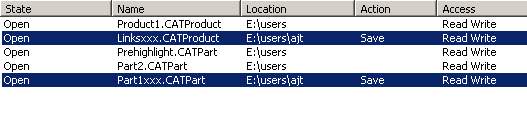
-
If you decided to add a prefix in step 2, click the
Apply Pattern button to propagate the pattern you set in the
Pattern Name box to all the selected documents (otherwise,
jump to the next step). In our example, *xxx has been
entered in the Pattern Name box:
 |
|
The validity of the each new document
identification is checked. If another document in the session or
in the file system has the same computed name, a pop-up message
is displayed to indicate which documents cannot be renamed and
you are asked whether you want to proceed or not. If you choose
to proceed, the pattern value will be assigned only to documents
that can be renamed.
If no problem occurs, all the files are renamed
and the new names are displayed in the Name column. To ensure
data consistency, all document links are automatically updated in
session, which means that applying a prefix or a suffix to a
single document may lead to an automatic save of other documents.
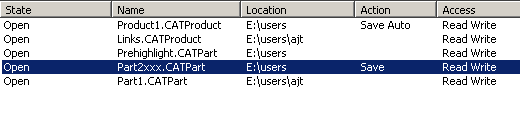
This is illustrated by the picture below: when the suffix
xxx is applied to Part2.CATPart, the "Save Auto" action is
assigned to Product1.CATProduct to indicate that this linked
document will be saved as well: |
 |
|
When you click the Apply Pattern
button, only the file name is modified, features such as part
number or root products are not impacted. |
Clicking the Apply Pattern
button has no effect on disk ; this only checks and initializes
the new names in memory. The files are physically saved on disk
with their new names when you click OK.
You can cancel the pattern application by clicking the Reset
button but note that the reset applies to the whole Save
Management dialog box and not only to the suffix or prefix
propagation. |
-
Click Save As... to open the
following dialog box:
-
Indicate the name of the new created file
in the File name box as well as the destination folder. If a
suffix xxx has been applied, it is also displayed in the
File name box.
-
Click Save.
") |
Selecting File > Save As
for a .CATProduct document containing other modified components
means that these components are assigned the "Save Auto" state
and are saved when clicking OK.
However, some "document-to-document" links are not be taken into
account, such as links that are not design prerequisites. For
instance, when saving a .CATDrawing document pointing to a
modified .CATPart document, the state of the .CATDrawing document
remains unchanged. |
|
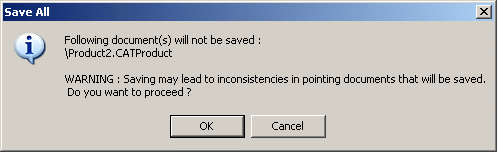
As explained above, the Save Management... command automatically
saves impacted files as well. If there are still unsaved files left
when you click OK, the following message is displayed: |
 |
But do not forget that two different documents open in session
cannot have the same persistent location because the system cannot have
two documents with the same identification. In this case, a warning is
issued and you cannot save conflicting documents.
This might happen, for instance, when a new document has been assigned
the location of another document already loaded in session (with
overwrite request) either using explicitly the Save As...
button, or using implicitly the Propagate Directory button. |
-
When you have saved a document in a new directory, you
can use the Propagate directory button to save the files
linked to this document into the same directory:
 |
Note that new documents with the "Auto Save"
status are saved in the directory of the document selected in the
list when clicking the Propagate directory, Save
or Save As... button.
If we take the above capture as an example, a new document with
the "Auto Save" status would be saved in "E:\users"
since "Car.CATProduct" is selected.To go back the
document original state, select the document then click the
Reset button. |
-
Click OK to confirm.
|
