This procedure describes how use the PERT chart, which provides a 2D view of processes and activities. If you have licenses for related 2D viewers, such as the Precedent Viewer, Product Flow Viewer, and System Editor, much of this information also applies to those viewers.
The PERT chart allows to you to visualize the sequence between activities belonging to the same hierarchical level in the process. A PERT chart is similar to a horizontal flow chart. Each box represents an activity, and the arrows between the boxes represent the sequence information.
This section has the following parts:
- Open the PERT chart
- Position activities or processes in the PERT chart
- View child activities
The layout of the PERT chart can also be changed. Refer to DPM Process and Resource Definition: Advanced Tasks: Altering PERT Chart Layout.
Create Precedence Constraint
![]() is not available in this viewer.
is not available in this viewer.
Open the PERT Chart
- Select an activity on the PPR tree, then click the Open PERT
Chart
 .
.
The PERT chart of the process is shown in a new window. The PERT chart that is opened shows the activities belonging to the selected activity. Note that only one PERT chart can be open at a given time for a specific activity.
Position Activities or Processes in the PERT Chart
The position of any activity in the PERT chart can be modified by selecting the box with the left mouse button and dragging it to the desired location. After changing an activity's position, it automatically snaps to the center of the nearest grid square when the mouse button is released.
You can also move and reposition several activities or processes in the PERT chart simultaneously. You can select processes in the PERT chart by pressing the Ctrl key and the left mouse button. You can use this shortcut not only in the PERT chart, but in similar 2D views to which you have licenses, including the:
-
PERT chart
-
Precedent Viewer
-
Product Flow Viewer
-
System Editor.
-
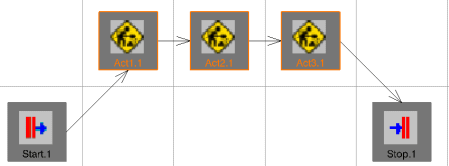
Use the left mouse button to select a process (in the example, it is the Act1.1 process}.
-
While holding down the mouse button, use the Ctrl key to select the next few processes. In the example, Act2.1 and Act3.1 are the processes selected.

Note: If you let go of the left mouse button before moving the selection completely, the selection is canceled. You can let the Ctrl key go when moving the selection. -
Move the selected processes to the new position. In the example, the three processes Act1.1, Act2.1 and Act3.1 have been moved and repositioned.
View Child Activities
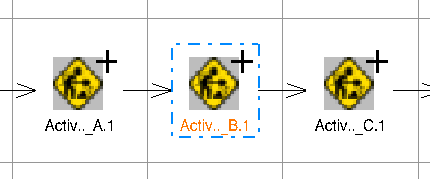
Click the + symbol to expand the selected PERT chart node and display its children, as shown here:
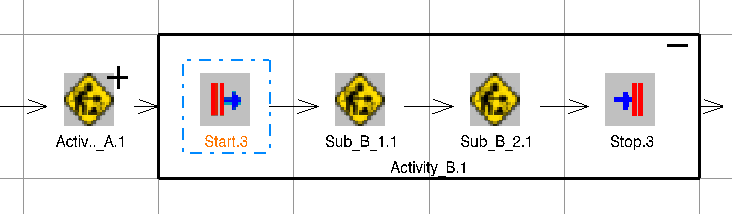
The selected activity is expanded into a bordered box which displays its child activities. If any of the child activities also have child activities, they can also be expanded in the same manner.
When expanded, the bordered box for the selected activity displays a - symbol in place of the + symbol. Click the - symbol to collapse the PERT node back to its normal state.