 |
This procedure describes how to measure a cylinder
feature. A cylinder feature measure will appear as an activity of
the process on the PPR tree.
In addition to measuring a feature by setting an measurement
path for a probe, you can also use an insert, sometimes known as a
JoPlug. This latter method is only available for in cylinders.
The inserts available are step and shoulder pins.
This procedure has the following sections:
|
 |
To measure a cylinder feature, you must have a product
loaded and a cylinder defined. |
 |
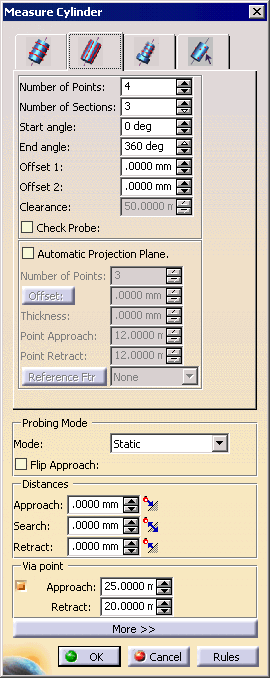
Measuring a Cylinder Feature
|
| |
-
Select the parent process or preceding activity for
the measure cylinder activity.
-
On the Inspection Activities toolbar, click
Measure Cylinder . .
-
Select the defined cylinder you wish to measure.
| A Measure Cylinder dialog box appears.
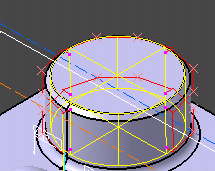
Select the first tab to measure the cylinder radially; the second
to measure it perpendicularly to the radius. |
 |
-
Alter the information in the dialog box as desired.
| A preview of the path appears as you alter the
data. |
 |
 |
In some cases, the probe cannot reach all of the
measurement points generated; it can only reach one arc of the
cylinder. In this case, select the Check Probe
option on the Measure Cylinder dialog box. This option generates
the measurement points only on the reachable arc of cylinder. The
arc is specified by the path parameters Start Angle and
End Angle, which are calculated by the option (as a
result, these options are disabled in the dialog box when
Check Probe is selected). The normal of the feature and the
stylus vector of the currently activated probe are used to
automatically compute the start angle and end angle of path and
then generate measurement points within this arc. |
| |
When measuring internal features, if the ratio of
diameter/length is greater than 2, you will be prompted with to
double check using collision detection tools. |
| |
Modifying the probe approach angles of a particular
probe automatically update all the measurement paths that use the
particular probe as the current probe. This means that start angle
and end angle parameters of path are recalculated for the modified
probe angle. |
| |
Move after, Reorder, and Delete Activity commands may
change the currently activated probe for measurement paths. Any of
these commands trigger an automatic update of the path to reflect
the new probe configuration for all features. |
| |
This feature only applies to Inspection Offline. |
-
Once you have defined the measurement desired, click
on the OK button.
| The activity is added to the PPR tree. |
| Note that creating a measure cylinder activity also creates a
tag list resource (which consists of cylinder path groups) and
cylinder path applications. |
| The measured cylinder appears highlighted on the part
geometry. |
|
|
|
When an outer cylinder is being measured, goto points
will be added automatically to avoid a collision. |
 |
Measuring a Cylinder using a JoPlug
|
| |
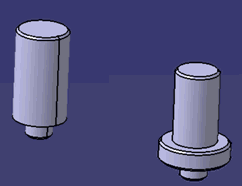
The insert or JoPlug for a cylinder can be
either a step pin (shown at left, below) or shoulder pin (shown at
right, below).
|
| |
-
Select the parent process or preceding activity
for the measure circle activity.
-
On the Inspection Activities
toolbar, click Measure Cylinder.
-
Select the defined in-cylinder you wish to
measure.
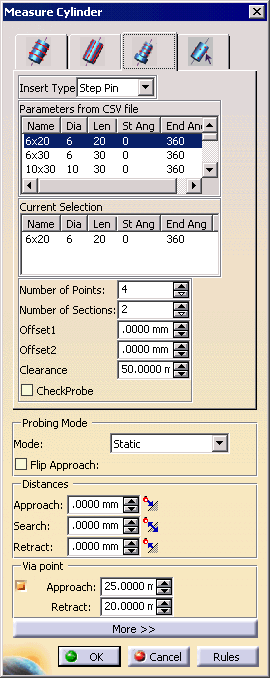
| The Measure Cylinder dialog box
appears; select the measure with JoPlug tab. |
 |
|
|
The Insert Type can be selected from a
pulldown menu; the default value is Step Pin.
The Parameters from the CSV File are either the
default values or are those customized by the user. If users
create their own CSV files, they can direct Inspection to the
files by specifying the path in the Tools>Options>Inspection
tab.
When a parameter is selected, its data appears in the
Current Selection box. The data in Current Selection
can be altered. When edited, the start and end angles are
checked to ensure that they are in the range of -360 to 360. If
this condition is violated, a warning message appears. The
out-of-range angles are set to -360 (if less than -360) or 360 (if
greater than 360).
The Check Probe option is activated only if
the start angle is 0 and the end angle is 360. |
| |
The following table provides the values for the default
CSV table for step pins. |
| |
| Name |
Diameter |
Length |
Start Angle |
End Angle |
| 6x20 |
6 |
20 |
0 |
360 |
| 6x30 |
6 |
30 |
0 |
360 |
| 10x30 |
10 |
30 |
0 |
180 |
| 10x50 |
10 |
50 |
0 |
180 |
|
| |
The following table provides the values for the default
CSV table for shoulder pins. |
| |
| Name |
Diameter |
Length |
Shoulder
Length |
Shoulder
Diameter |
Start Angle |
End Angle |
| 6x20x3 |
6 |
20 |
3 |
12 |
0 |
90 |
| 6x30x3 |
6 |
30 |
3 |
12 |
0 |
90 |
| 10x30x5 |
10 |
30 |
5 |
20 |
0 |
180 |
| 10x50x5 |
10 |
50 |
5 |
20 |
0 |
180 |
|
-
Alter the information in the dialog box as
desired.
| A preview of the path appears as you alter the data. A
wireframe of the insert also appears. |
-
Once you have defined the measurement desired,
click on the OK button.
|
| |
Customizing the JoPlug CSV File
|
| |
Users may create their own JoPlug CSV files.
The customized step pin CSV file must have five columns of data; the
shoulder pin CSV file must have seven columns of data. The path to
the customized file is set in the Tools > Options > Inspection
tab. |
| |
Knowledgeware Compatibility
|
| |
Using Knowledgeware Expert, the measurement
strategy can be set to Jo-plug by writing the rule below in rule file.
IF HoleDiameter < 6 THEN ( MeasurementStrategy = JoPlug ) |
| |
DMIS Export
|
| |
-
The export of measurement of cylinders with
JoPlug is done in the following steps:
-
The cylinder feature to be measured is
exported.
-
The two bounding planes for the feature are
exported.
-
A cylinder with the JoPlug parameters (dia,
position, length) is exported.
-
The measurement points for the above cylinder
is exported.
|