Change Order Management

Change orders are used to request and track changes in a project. Change orders are created in Process Engineer, and become accessible in DPM during the creation of a new alternative or version of a process.

Applying a Change Order

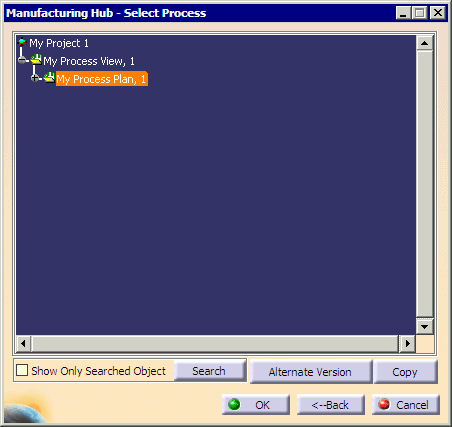
  1. Open a project and select a process for which an alternative needs to be created:

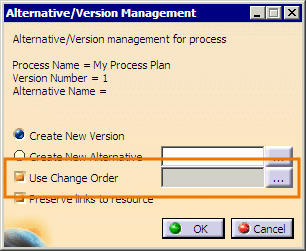
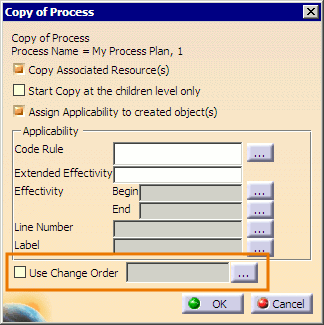
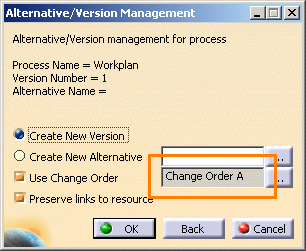
  2. Click the Alternate Version button (or the Copy button) to begin the creation of an alternative. In either resulting dialog box, a Use Change Order option is provided:

    When Alternate Version is clicked:

    When Copy is clicked:


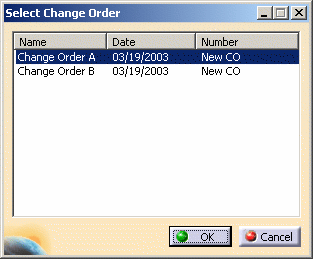
  3. Click the button to open the Select Change Order dialog:

  4. Select a Change Order from the list, and click OK to load it into the Alternative/Version Management dialog:

    Click OK to apply the selected Change Order.

How the Change Order is applied


When creating a new version

When creating an alternative version, the selected Change Order object is applied to both the new and old versions of the process and its subprocesses. It is assigned to the processes of the new version as Change Order Begin, and assigned to the processes of the old version as Change Order End.


When creating a new alternative

When creating an alternative version, the selected Change Order object is applied only to the new version of the process and its subprocesses. It is assigned to the new version as Change Order Begin.


When creating a new version via copy

When creating a new copy of a process, the selected Change Order object is applied only to the child process(es) of the copied process. It is assigned to the copied child processes as Change Order Begin.

ENOVIA Change Order

A new type of change order ENOVIA Change Orders (ECO) is available in Manufacturing Hub. It is created by the Change Order (CO) Loader in MCM Projects. It reduce the amount of data in the Action root folder to avoid having to load all Mfg Change Order each time in order to get an Action Proxy/Mod Statement in the Open Project Dialog (OPD). The ENOVIA change orders takes part in filtering using Filter by CO in OPD.

The OPD shows all the Change orders linked to the selected filterset and these can include either manufacturing change orders, ENOVIA change orders or both. By defaults the CO Loader loads the Manufacturing Change Order into ENOVIA Change Orders folder.

The folder ENOVIA Change Orders is available in DPE Project library for MCM projects, by default. The ECO's are created inside the folder ENOVIA Change Orders in the Project Library and also under another ECO. The ECO's created inside the ENOVIA Change Orders folder are linked to each other and with other ECO in order to create a hierarchy. An ECO can be moved under another ECO in ENOVIA Change Orders folder by drag and drop. Relation can be created between ECO's with calculation models and parts. The folder ENOVIA Change Orders has no impact on filtering behavior with existing Manufacturing Change Orders.

The ENOVIA change orders are not available in the Mod-statement selection Dialog and no action proxies can be created under them.

You can display only top level ECOs.

Support of Filtering By ENOVIA change order in DPE capability is available only for MCM projects.

Support of Filtering By ENOVIA change order in DPE capability is applicable to filter the product data only.

Sort and Override Support for Change Order

You can sort and display change orders (manufacturing/ENOVIA change order) list. You can also override CO status to PRE/POST by single click.

  1. Select File > Open Project from Manufacturing Hub, or select Open Project from Manufacturing Hub in the Manufacturing Hub toolbar.
    The Open Project Dialog comes.
  2. Select the checkbox Apply Filtering by Change Order and select next to it.
    This checkbox is available in both Open Project Dialog and Edit Manufacturing Document Info.
    The change orders linked to the selected calculation model are displayed in Change Order dialog box.

By default Change Orders dialog will display the sorted list, sorted using Change Order (CO) column in ascending order. Sorting can be done based on any of the columns by clicking on the column title in the header. Sorting order for a particular column can be toggled between ascending and descending by clicking on the column title.

  1. Select Apply PRE/POST to all Change Orders to overridde the change orders as PRE/POST.
  2. Filtering mode of the CO can be changed by selecting the row and double clicking on it. Filtering Mode dialog box is displayed with the combo box value set to the current filtering mode of the CO.

  1. Select the mode and click OK to change the mode
  2. Click Cancel to cancel the selection. Modified filtering mode is displayed in the List.
  3. Click Apply to update the changes made to the COs in the Change Orders dialog.
  4. Click Close to cancel the changes without clicking Apply button.

Limitations 

  • The number of columns in Change Orders dialog box is fixed. Extra columns cannot be added.
  • Columns in Change Orders dialog cannot be reordered.
  • The Change Orders cannot be drag/drop in Change Orders dialog box to change the displayed sorting order.
  • Change Orders displayed in Select Modification Statement dialog are not sorted.
  • Sorting criteria applied in the Change Orders dialog box is not persistent.