-
Click Analysis Configuration
 .
. -
Use the arrow buttons to move the analysis objects from the Available to the Selected pane.
-
Click the Analysis Level heading so that all of the analysis objects no longer have the Off setting.
-
Click Analysis Mode On/Off
 .
.
This command functions as toggle:
- When the icon is not highlighted, the analysis status is set to Off (default mode). It deactivates all the analysis checks.
- When the icon is highlighted, the analysis mode is set to
On. When on, all the analysis and
the device and robot checks selected in
Selecting the Analysis Configuration are performed. If, however,
the analysis mode within the dialog box generated by Analysis
Configuration is set to
Off, that overrides setting the Analysis Mode
to On.
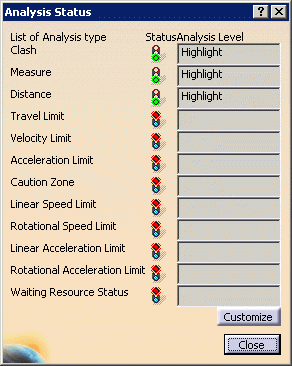
If you have the Display Analysis Status Window check box selected in Tools > Options > DELMIA Infrastructure > Analysis, Analysis Display On/Off  appears highlighted.
 The Analysis Status dialog box appears. 
-
Click the Customize button.
The Customize Analysis Status dialog box appears. 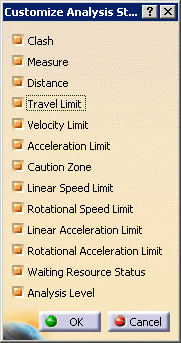
The box consists of a list of possible analysis objects. -
Clear the check boxes associated with the analysis objects whose status you do not want to follow, then click OK.
The Analysis Status dialog box appears in its filtered form. 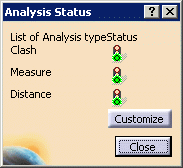
-
Click Customize again, and select the Analysis Level check box.
The Analysis Status dialog box appears in its filtered form. 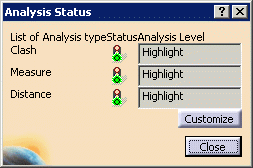
-
Click the Status icon next to one of the analysis objects.
You cannot perform this action while you are running a simulation. The Status icon has a toggle function: - Green
 signifies that the analysis is On (i.e., in Highlight,
Verbose,
or Interrupt mode)
signifies that the analysis is On (i.e., in Highlight,
Verbose,
or Interrupt mode) - Red
 signifies that the analysis is Off.
 - Orange
 is possible only for the Interference, Distance and/or
Measure objects. Orange signifies that simulation is enabled
to perform the corresponding analysis type, but no analysis
object of that type is computed. This light changes to green
while the simulation is running if an analysis object of the
corresponding type is computed.
is possible only for the Interference, Distance and/or
Measure objects. Orange signifies that simulation is enabled
to perform the corresponding analysis type, but no analysis
object of that type is computed. This light changes to green
while the simulation is running if an analysis object of the
corresponding type is computed.
- Green
-
Run the simulation or jog to see the analysis results.

Closing the Analysis Status dialog box while a simulation is running sets the Analysis Mode to Off.