
|
Multiple-Constraints Snap consists in creating a series of constraints
on-the-fly, thereby reducing the degrees of freedom of the components.
One distinguishes four states:
- selection of the component to be moved
- selection of the 1st geometric element, belonging to the to-be-moved
component
- selection of the 2nd geometric element, belonging to
the component to which the to-be-moved component will be snapped
(henceforth referred to as the receiving component)
- a state where the user is asked to accept the proposed
solution or to invert the snapping direction
|
 |
You can now choose among several
input selection types in order to specify and filter the pre-selected
geometries.
- Any geometry: The behavior is the same as the default behavior
provided in previous versions.
- Point only: Only points can be selected. Notice that when switching
from Design mode to Visualization mode, some points (in fact vertex) are
no longer selectable (neither highlighted). To select those points (in
fact edge limits), you will have to use the Characteristic points
option.
- Line only: Only straight edges can be selected.
- Plane only: Only planar surfaces can be selected. Notice that the
plane representation displayed during pre-selection is now centered on
the center of gravity.
- Characteristic points: On curves (lines, circles and curves), you
could want to select the mid-point or the extremity points. The
pre-selected point is the closest point to the picking point.
- Arc center: The center of the arc is selected.
- Picking point: The point on geometry under the mouse cursor is
selected.
- Picking axis: An axis is built, with the picking point as origin and
the normal of the picked face or the tangent of the picked edge as
Z-axis.
The following table summarizes the behavior:
|
Geometry type selected in combo |
Detected geometry |
| Any geometry |
line: line
plane: plane (origin in COG)
axis system: axis system
circle, cylinder, cone: line (axis)
sphere: center
curve, surface, volume: picking point |
| Point only |
point: point |
| Line only |
line: line
circle, cylinder, cone: line (axis) |
| Plane only |
plane: plane (origin in COG)
circle: plane containing the circle |
| Characteristic points |
point: point
line, circle, curve: start, middle, or endpoint (whichever is closest
to picking point)
plane: COG
axis system: origin
sphere: center |
| Arc center |
circle: center |
| Picking point |
all geometry types: point |
| Picking axis |
line: Z-axis
plane, cylinder, cone, sphere, surface, volume: Z-axis normal at
picking point
axis system, circle, curve: Z-axis tangent at picking point |
|
|
|
Selected Geometry Type |
| |
|
Any geometry |
Point only |
Line only |
Plane only |
Character-
istic points |
Arc
center |
Picking point |
Picking axis |
D
e
t
e
c
t
e
d
g
e
o
m
e
t
r
Y |
Point |
point |
point |
|
|
point |
|
point |
|
|
Line |
line |
|
line |
|
start, middle or end point (the closest to the picking point) |
|
point |
z axis |
|
Plane |
plane (origin in COG) |
|
|
plane (origin in COG) |
COG |
|
point |
z axis normal at picking point |
|
Axis system |
axis system |
|
|
|
origin |
|
point |
z axis tangent at picking point |
|
Circle |
line (axis) |
|
line (axis) |
plane containing the circle |
start, middle or end point (the closest to the picking point) |
centre |
point |
z axis tangent at picking point |
|
Cylinder |
line (axis) |
|
line (axis) |
|
|
|
point |
z axis normal at picking point |
|
Cone |
line (axis) |
|
line (axis) |
|
|
|
point |
z axis normal at picking point |
|
Sphere |
centre |
|
|
|
centre |
|
point |
z axis normal at picking point |
|
Curve |
picking point |
|
|
|
start, middle or end point (the closest to the picking point) |
|
point |
z axis tangent at picking point |
|
Surface |
picking point |
|
|
|
|
|
point |
z axis normal at picking point |
|
Volume |
picking point |
|
|
|
|
|
point |
z axis normal at picking point |
|
") |
Open the
SMART_TARGET.CATProduct file from the cfysm samples folder:
SMART_TARGET.CATProduct
|
 |
Before you launch the Snap
command, you should be sure to select a component in the Specification Tree
other than the root.
|
 |
-
Click the Cumulative Snap icon
 . .
The Cumulative Snap toolbar appears.
The toolbar icons are grayed. If the two selected geometric elements
are two lines, two planes, an axis system and a line or an axis
system and a plane, the toolbar icons will be activated.

The Cumulative Snap toolbar
enables you to invert by rotation around two axes: around the U axis (as
was proposed in previous releases) and around the V axis. |
|
|
|
The Cumulative Snap functionality
does not take the UI-activated component into account. You must explicitly
indicate the component to be moved. (If you wish to simulate the
UI-activated behavior, you can select the UI-activated component in the
specification tree.)
|
|
-
Select the component to be moved, e.g. the Disk cylinder.
-
Select a geometric element (a point, line, plane or axis
system) on the same to-be-moved component, e.g. a circle of which the
center is the center of the entire Disk cylinder in the sample product.
-
Select a geometric element on the component to which the
to-be-moved component will be snapped, e.g. a circle of which the center
is the center of the entire Rim cylinder in the sample product
(henceforth
referred to as the receiving component).
The first constraint is created. The Disk cylinder is displaced in
accordance with the first constraint. You can continue directly to the
creation of the second constraint.
-
Select a geometric element on the to-be-moved component,
e.g. the axe passing through one of the nuts of the Disk cylinder.
-
Select a geometric element on the receiving
component, e.g. the axe passing through one of the nut holes of the Rim
cylinder.
The second constraint is created. The Disk cylinder is displaced in
accordance with the second constraint. You can continue directly to the
creation of the third constraint.
-
Select a geometric element on the to-be-moved component,
e.g. the plane of the Disk cylinder containing the nuts.
-
Select a geometric element on the receiving component,
e.g. the plane of the Rim cylinder containing the nut holes.
The third constraint is created. The two components have been placed
together as a function of the three constraints.
-
Rotate to verify that the snap has been implemented as
desired.
Multi-selecting Components
|
| |
The goal of this enhancement is to
enable the selection of multiple components as input. You must the select
all the components (in the product tree or in the 3D geometry) before
launching the Cumulative Snap command. Once in the command, you will then
be able to select the first geometry to snap from among any of the
components belonging to the selected input. |
|
|
Note the following limitations:
- Multi-selection is only available before you launch the Cumulative
Snap command. If you do not make a selection before you launch the
command, the multi-selection will not be available.
- Other objects currently handled (e.g. shuttles) will
not be supported for multi-selection.
|
| |
Multi-selecting Components with Ascendance Relation
Consider the following structure:

If you select [P1.1, P1, P2], you will be able to select a first
geometry belonging to P1 (geometry can belong to P1.1 or not) or P2, and a
second geometry under P3. The transformation computed to snap the first
geometry on the second geometry will then be applied to P1 only, highest
father of the sub-set [P1, P1.1] and P2. This ensures that the set of
components selected as input to the Cumulative Snap command will be kept as
a rigid bloc along the definition of multiple constraints, which is a
condition to the definition of a consistent constraints environment.
|
|
|
Open the
5cubes_with_data.CATProduct file from the dmnug samples folder:
5cubes_with_data.CATProduct
|
|

|
|
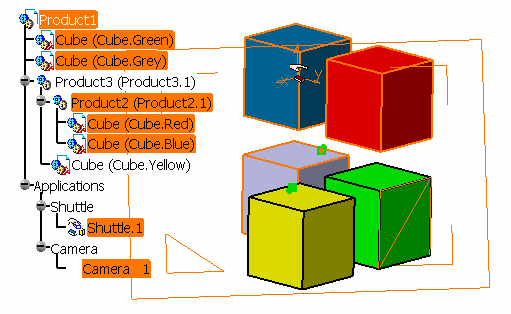
-
Keeping the Ctrl key pressed, select
Cube.Red, Cube.Blue and Shuttle.1 geometry
using the selection trap (by dragging a rectangle to encompass the
desired selection), select a face of Cube.Green in geometry,
select Cube.Grey, Product2.1, Product1
and Camera 1 in the specification tree.
You should have something like this:
-
Click the Cumulative Snap icon
.
The selection will be filtered and only the Cube.Green,
Cube.Grey, and Product2.1 components will be
highlighted.

-
Select the top face of Cube.Blue as the first
geometry to snap.
You will notice that selection of the first geometry is possible anywhere
except on the yellow cube.
-
Select the top face of Cube.Yellow as the
second geometry to snap.
You will notice that selection of the second geometry is possible only on
the yellow cube.
The highlighted components can now be moved as a rigid block.
|
|

|


