Make sure that the 3D Annotation Query Switch On/Switch
Off icon
![]() is activated.
is activated.
Migration at Product Level
-
In the specification tree, expand the V4data and then the *MASTER nodes under Product.1.
-
Copy the *TOLP2 annotation set which is located under the *MASTER node, by selecting it and pressing Ctrl+C for example.
-
Paste the annotation set right under Product.1, using Ctrl+V for example.
-
Wait for the migration to complete. This may take some time, depending on the amount of data to handle.
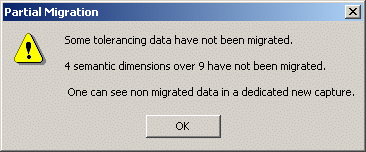
When the migration is over, a dialog box appears, informing you that some data could not be migrated, and that a capture was created for non-migrated data. Click OK to close it.
Also, a new annotation set, Copy of *TOLP2, is created under the Product.1 node in the specification tree. 
- The created annotation set uses the V4 parent standard.
- Migrated annotations are associative to V4 geometry.
-
Under the Copy of *TOLP2 annotation set node, expand the Captures node and click Non migrated annotations of *TOLP2 to visualize the V4 data that could not be migrated.
Migration at Part Level
CATIA V4 dimensioning, tolerancing and annotation data can also be converted in CATIA V5 at CATIA V5 part level. The converted data is associative to the converted CATIA V5 geometry.
The conversion of CATIA V4 data is possible in two modes:
|
Interactive Mode
-
Select the *MASTER, right-click and select Copy.
-
Open a new CATPart document.
-
In the new CATPart, right-click the PartBody (root node in the feature tree) and select Paste Special.... The Paste Special dialog box is displayed.
-
Select CATIA_SPEC in the Paste Special dialog box.
-
Click OK.
-
When the migration is over, a Partial Migration dialog box appears, informing you that some data could not be migrated. Click OK to close it.
-
An annotation set is created in the converted CATPart. It contains converted CATIA V4 data associated with appropriate CATIA V5 geometry.

Batch Mode
-
Start a Version 5 Session.
-
Select Tools > Utility command. The Batch Monitor dialog box opens. A list of Version 5 batches along with their description gets displayed in the Type column.
For more information about the Batch Monitor, please refer to Running Batches Using the Batch Monitor, in the Infrastructure User Guide. -
Select PLMV4ToV5Migration. This utility allows you to convert CATIA Version 4 models to CATIA Version 5 models. The PLMV4ToV5Migration dialog box is displayed.

In the Selected Operation area, you can choose following Option:
|
-
Click the Open
 button
to select the file or files to be migrated. The
File Selection dialog box is displayed.
button
to select the file or files to be migrated. The
File Selection dialog box is displayed.

-
Click Member... button in the Input Options field to select the files to be migrated.
-
Select the target directory to save the migrated file in the Default target directory.
-
Click OK.
-
In the PLMV4ToV5Migration dialog box, select the target directory in Target Directory, to save the result HTML file. A dialog box is displayed. Browse to the directory, select it, and click OK.
-
Click Run. The batch execution starts. After the batch execution, the converted CATParts are saved in the target directory and the output HTML report file can be viewed.