|
What is a flat region?
|

|
| |
Car body parts need to have a certain minimum curvature. In surface areas that fail to meet this requirement,
the sheet metal tends to spring back elastically after the forming process, so that the desired shape and aesthetics are not
achieved in the manufacturing process. Exceedingly flat areas, therefore, need to be identified and adjusted before manufacturing
the press tools. |
| |
Analysis interpretation
|
| |
With this analysis, those critical areas can be graphically highlighted. Through suitable parameter settings you
can discover whether the flatness is in one direction, or if there are regions where the panel is flat in several or even in
all directions.
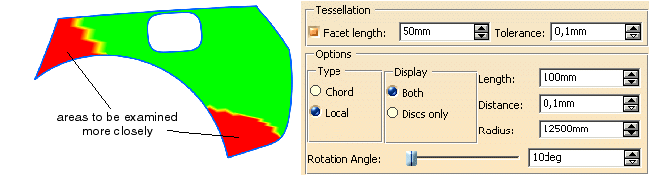
The result is a red-green analysis that first of all enables only a qualitative assessment. The following can be realized:
| Color |
Meaning |
| Red |
The set criterion for the minimum curvature is not met in a specified sector (see
Which importance has the rotation angle?). The area has to be examined more closely. It is the user who has to decide
whether it is a flat region or not. |
| Green |
The criterion is met, there is no danger. |
Using the subsequent manual deviation analysis you can additionally make a qualitative evaluation as this analysis also shows
the actual curvature. |
| |
Definition of flatness
|
| |
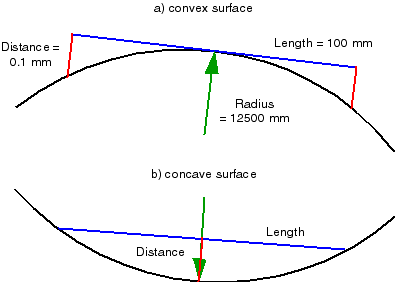
Experience has shown that the minimum curvature radius should be approximately 12500 mm. This corresponds to a minimum distance
from the geometry of 0.1 mm over a chord length of 100 mm. These are the default settings of the options
Length, Distance and Radius in the dialog box.
The minimum curvature radius is defined by length and distance. |
Definition of the minimum curvature radius
 |
| |
Flat region check in practice
|
| |
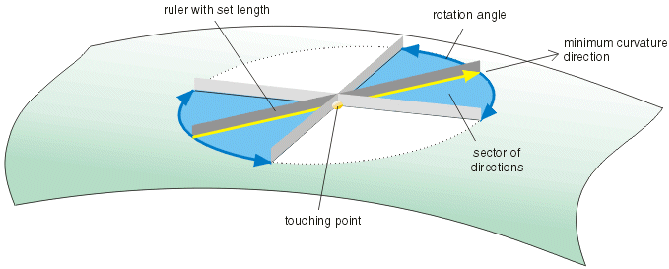
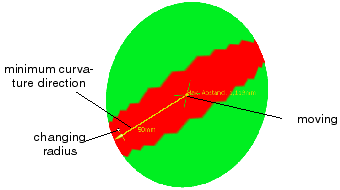
The 'ruler/disk method' is used in the car body manufacturing. To concave parts applies: If you move a ruler with
a length of 100 mm across the car body surface, a minimum gap of 0.1 mm should remain between the surface and the middle of
the ruler, no matter where you place it. To convex parts applies: If you place the middle of the ruler tangentially on any surface
point, the gap remaining between the surface and the ends of the ruler should be at least the amount of 0.1 mm.
See also figure Principle of the ruler/disk method. |
| |
What are the verification methods used in the Flat Region Analysis?
|
|
| |
The analysis offers the ruler/disk method, and additionally a method performing a local check (options under
Type), which are described in the following.
In addition, you can execute a subsequent manual deviation analysis (see How is
the subsequent deviation analysis used?) that enables an accurate assessment of the curvature situation at a specific surface
point. |
| |
Ruler/disk method (Chord)
|
| |
- Mode of operation: The virtual ruler with a length of e. g. 100 mm is placed with its centre point tangentially
on the surface to be verified and revolved about the centre point. The rotation axis coincides with the surface normal at
this point. The rotation defines a planar disk with a radius of 50 mm touching exactly one facet point.
The system now checks for this point whether - when revolving the ruler - the curvature lies below a specified minimum value
at each position within the sector defined by the Rotation Angle. Only if this is the case in the entire sector, the point
will be displayed in red.
This procedure is executed for each individual facet point of the surface.
Whether a point is displayed in red depends on the specified rotation angle. At 1° a point can be red, at 10° green.
For a detailed description and illustrative figures about the definition of the rotation angle, please refer to
Which importance has the rotation angle?.
- Advantages and disadvantages: As the surfaces are analyzed as a whole, i. e. across patch boundaries, the ruler/disk
method delivers a very precise result, but is considerably slower than the local method. Saddle points and other flat regions
which are not relevant for sheet metal forming are not found but only real flat regions (see figure
Analysis result with the ruler/disk method).
Principle of the ruler/disk method

|
|
Local method (Local)
|
| |
- Mode of operation: You can specify a curvature radius that shall not be exceeded, e. g. 12500 mm. In an infinitely
small area around the evaluated facet point, the system mathematically calculates the actual curvature in the appropriate
point and compares it with the defined minimum curvature. If the minimum curvature is kept, the point will be displayed
in green. Whether the point is displayed in red depends on the set rotation angle.
Topological relations are not relevant, i. e. the check is done only on the current surface.
- Advantages and disadvantages: The local method is set as default in the menu because it delivers a considerably
quicker result than the ruler/disk method due to the faster facet creation. If all areas are displayed in green, there is
maximum certainty that no flat regions exist.
Red areas point out areas that have to be examined more closely. Not only real flat regions but also saddle points which
are not relevant for the sheet metal forming process are detected (see figure Analysis
result with the local method). Moreover, the results at boundaries between two surfaces (flat surface - surface with
a stronger curvature) may be misleading. If areas having no relevance for the forming process should be excluded, the ruler/disk
method has to be used.
|
| |
Comparison of the verification methods
|
| |
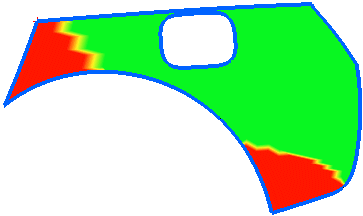
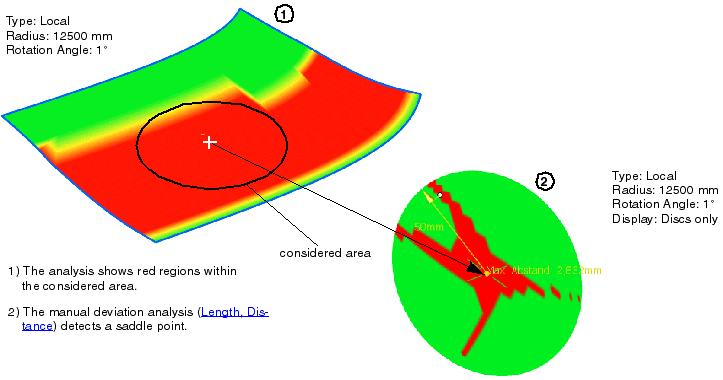
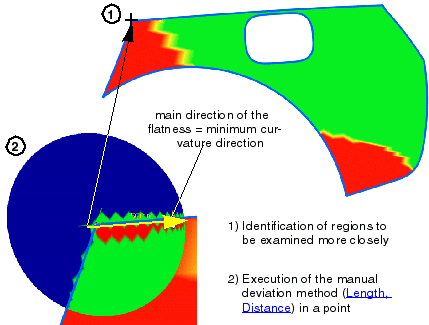
The following figures illustrate the different results of both verification methods. They show a surface that
contains saddle points. The ruler/disk method does not find these areas, whereas the local method finds them.
Analysis result with the ruler/disk method
Analysis result with the local method
|
| |
Which importance has the rotation angle?
|
|
| |
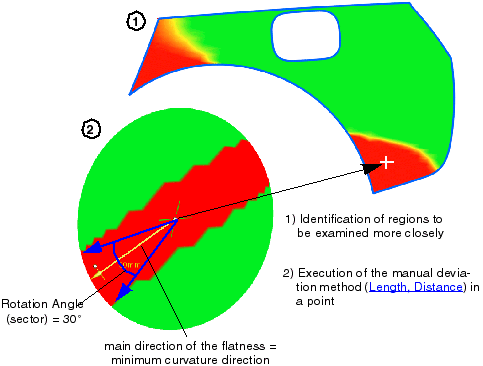
Flat regions can be in one, or several and all directions. With the Rotation Angle
you can determine which type of flatness is considered to be a risk. Thus you are deciding which opening angle of the ruler
(sector) is the threshold at which sheet metal forming becomes problematic. Such a sector is identified by rotating the ruler
tangentially about its centre point where it touches the surface, starting at the minimum curvature direction and pivoting to
the left and right of this direction as far as exceedingly small curvatures are encountered. Only if this is the case at each
position of the ruler within the sector, the point will be displayed in red.
The following types of flat regions are distinguished:
|
| |
- Flatness in one direction (Rotation Angle = 1°): At a rotation angle of 1° (slider position at the very left),
the investigated surface point will be marked in red if the ruler revolving about its centre point detects a curvature value
below the defined minimum in even a single direction (within this small sector of 1°). Using this initial value will result
in a maximum number of red regions.
If the curvature of the material is less than the minimum curvature in only one direction, e. g. surfaces having the curvature
of a cylinder, this may still be perfectly acceptable.
|
Rotation Angle = 1°
 |
| |
- Flatness in a sector of directions (Rotation Angle between 1° and 180°): Sheet metal forming problems often
do not arise until there is flatness not only in one direction, but in a sector of directions.
The rotation from the direction of the minimum curvature direction to the left and right of e. g. 15° degrees results in
a sector of 30° that can be swept by the rotating ruler without encountering the required minimum curvature value. If you
increase the rotation angle, the number of areas marked in red decreases.
|
Rotation Angle = 15°
 |
| |
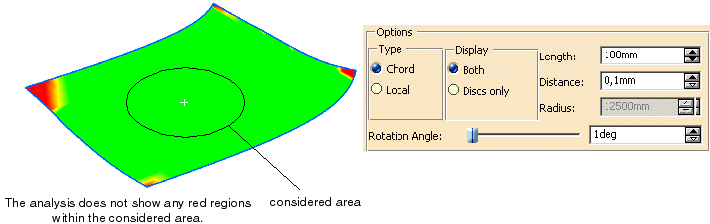
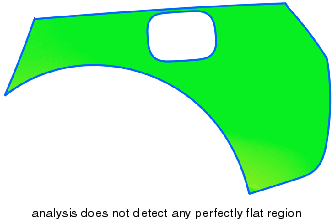
- Flatness in all directions (Rotation Angle = 180°): The extreme case, i. e. a perfectly flat region, exists
if the ruler can fully revolve about its rotation axis (sector of 360°) without encountering the minimum curvature value
at any position. Such regions are always critical and should be avoided by all means.
If you define a rotation angle of 180° (slider position at the very right), the analysis should not show any red region
at all if the evaluated part is ok.
|
Rotation Angle = 180°
 |
| |
How is the subsequent deviation analysis used?
|
|
| |
The manual colored deviation analysis is an add-on to the Ruler/disk method (Chord). The
difference between a Bézier surface replacing the disk and the surface covered by the disk will be measured by comparing the
surfaces. This method enables a both qualitative and quantitative assessment of the curvature situation at the investigated
surface point.
As the facetisation of the surface model is displayed (view mode 'Wireframe'), you may additionally assess whether the selected
side length of the tessellation makes sense in relation to the disk. |
| |
Proceeding of the deviation analysis
|
| |
-
Carry out the analysis with the desired parameters: Ruler/disk method (Chord) or Local
method (Local).
-
Select via the selection field 'Points' within the red marked area which shall be examined more closely
an existing point or create a point via the contextual menu.
-
A disk is placed with its centre point directly in the surface point that has been picked (distance = 0
in the centre point). The disk radius results from the specified Length of the virtual ruler
(50 mm at a default length of 100 mm). The disk radius adapts in its position to the underlying surfaces as good as possible.
The disk normal is aligned at the surface normal in the point.
-
The colored deviation analysis is shown on the circular surface. It is a real deviation analysis, but with
an inverted color display. All points being nearer to the underlying surface than the specified value for
Distance (default
= 0.1 mm) will be displayed in red, the points further from the surface than that value in green.
The minimum curvature radius is represented by a vector arrow.
-
The disk can be moved across the surface at its centre point (left mouse button at the vector origin). In
addition, the vector length, and thus the disk radius, can be modified (left mouse button at the handle on the arrow tip).
This also changes the value Length in the text field of the dialog box.
|
Manual disk analysis
 |
| |
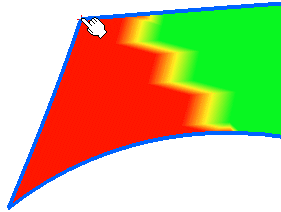
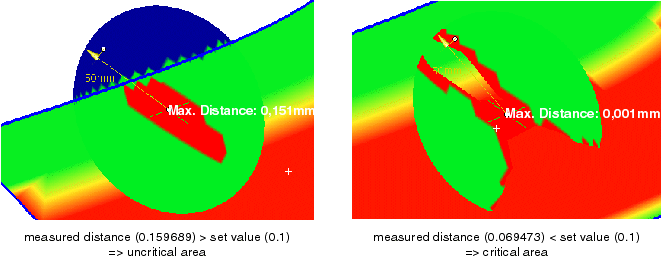
Interpretation of the analysis result
|
| |
The direction of the smallest curvature, the flat region, in the selected surface point (centre point of the disk)
is represented by a vector symbol (minimum curvature direction). It corresponds to the main direction of the red area.
The shortest distance between disk and surface is measured and displayed in the following colors:
| Color |
Meaning |
| Red |
all surface points with the property: measured distance < set value |
| Green |
all surface points with the property: measured distance > = set value |
| Blue |
no result (the disk protrudes the surface edge) |
At the arrow tip, that means at the disk edge and in the direction of the minimum curvature, the amount of the deviation between
the circular periphery and the corresponding surface point is determined and displayed as numerical value.
Flatness becomes critical not until the red area touches the circular periphery, and the curvature values are below the minimum
curvature in the entire sector.
Detection of a critical area with the deviation analysis
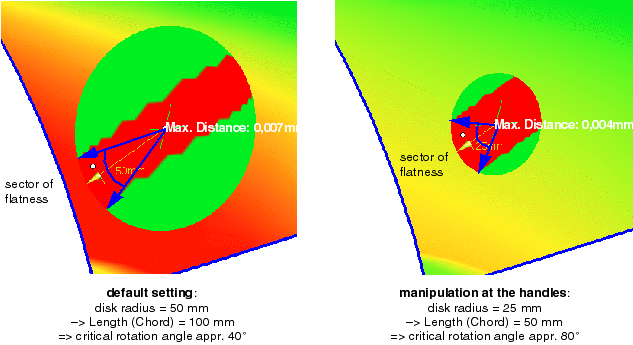
The critical rotation angle can be identified from the size of the red sector. If the disk radius is modified, the criterion
for the minimum curvature changes as well leading to a different analysis result.
Modification of the disk radius
|
 |
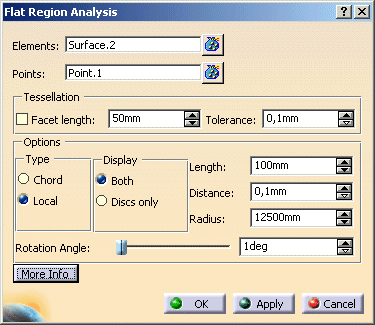
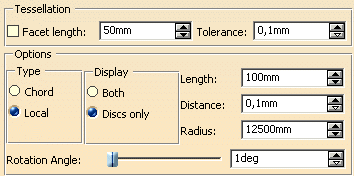
You can define the following options:
|
|
- Tessellation: The Analysis is based on triangulated data. That means that surfaces are converted into a facet
model before they are checked.
- Facet length: Maximum length of the facets, regardless of the surface curvature.
Flat regions are identified
precisely with this method, however, it requires more computing time. The smaller the value for the facet length, the
more precise, but also slower is the computation.
- Tolerance: Maximum deviation of the facet model from the surface for a curvature dependent tessellation.
The surfaces are subdivided into smaller facets until the distance of the planer facets from the surfaces is smaller
than this value. Through this, large facets are created on areas with a lower curvature, and smaller ones on surfaces
with a stronger curvature. this method delivers a quick result, but in flat regions it may lead to results that are
hard to interpret.
|
Facet Length
Tolerance
|
| |
Options
- Type: Two analysis methods are available: the ruler/disk method (Chord)
and the local method (Local).
For a detailed description of both methods please refer to What are the verification
methods used in the Flat Region Analysis?.
For performance reasons it is recommendable to start the computation with 'Local' (default setting). This method delivers
a considerably quicker result than 'Chord'. If all surfaces are marked in green, there are definitely no flat regions. If
red areas are found, you should definitely use 'Chord' afterwards in order to exclude saddle points and other uncritical
areas. This method delivers a very precise result, but is considerably slower than 'Local'.
The subsequent deviation analysis (Selection of points via selection field 'Points') also runs faster with the setting 'Local'
(see also Proceeding of the deviation analysis).
- Display: Both, Discs only: Display mode for the analysis result: You may choose between display of surfaces
and discs or discs only.
- Length, Distance: Length of the virtual ruler (chord) and minimum distance between
ruler and geometry for 'Chord'. These parameters define the minimum curvature. Please refer to
Flat region check in practice and Ruler/disk method (Chord).
- Radius: Minimum curvature radius for 'Local'. Please refer to
Definition of flatness, and Local method (Local).
- Rotation Angle: With this slider you can determine, which type of flatness shall
be found. The system checks within the sector defined by the rotation angle whether the minimum curvature is kept.
For a detailed description of the rotation angle definition including illustrative figures please refer to
Which importance has the rotation angle?.
The angle of rotation can also be specified directly in the text field.
The following table shows how the rotation angle
should be set in order to find the different types of flatness:
|