-
Click the Single Light Band Mapping Analysis icon:

The Single Light Band Mapping dialog box appears.
The single light band mapping analysis options are displayed:
-
Options:
-
 Viewpoint Dependent Mode: fixes the direction relative to the screen and the geometry
can rotate independently to that direction
Viewpoint Dependent Mode: fixes the direction relative to the screen and the geometry
can rotate independently to that direction -
 Global Mode: performs the analysis on all the surfaces of the active part, otherwise only
the selected surfaces are analyzed.
Global Mode: performs the analysis on all the surfaces of the active part, otherwise only
the selected surfaces are analyzed. -
 No Highlight
Representations: removes the highlight representation from selected elements.
No Highlight
Representations: removes the highlight representation from selected elements.
-
-
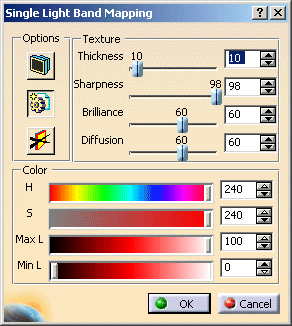
Texture:
-
Thickness: sets the texture thickness value.
-
Sharpness: sets the texture sharpness value.
-
Brilliance: sets the texture brilliance value.
-
Diffusion: sets the texture diffusion value.
-
-
Color:
-
H: sets the hue color value.
-
S: sets the saturation color value.
-
Max L: sets the maximal luminance color value.
-
Min L: sets the minimal luminance color value.
-
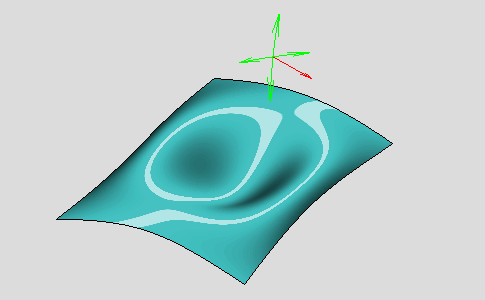
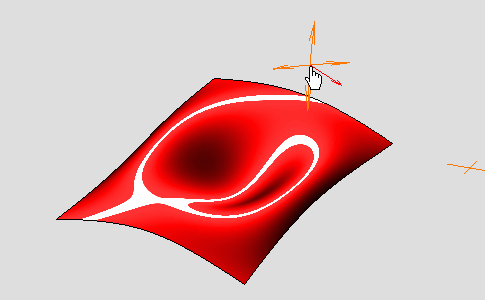
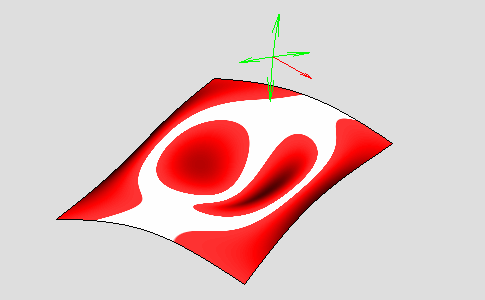
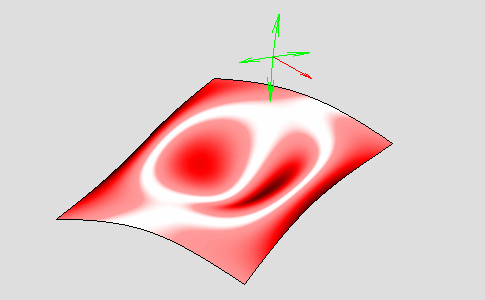
The single light band is displayed on the surfaces and the single light band manipulator appears.

Manipulation
-
Move the manipulator to change the light direction.

According to the selected arrow of the manipulator you can rotate it around two axes:


If you select all the manipulator you can rotate it freely:
-
The red arrow of the manipulator indicates the center of the rotation.
-
When you click it the manipulator is moved to the opposite location according to the center of the rotation. This action only changes the manipulator location, not the light orientation.
-
Right-click the manipulator to display contextual menu items.
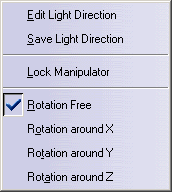
The following commands and options are available:
-
Light edition:
-
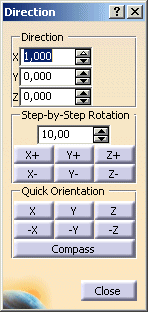
Edit Light Direction: displays the Direction dialog box,
-
The Direction frame allows you to define the absolute values for the direction.
-
The Step-by-Step Rotation frame allows you to define the angle increment, the rotation axis and its direction.
-
The Quick Orientation frame allows you to orientate the direction according to the main axes or the Compass direction.
-
-
Save Light Direction: displays the Save Direction dialog box,
-
Click Save to save the current direction in the list.
-
Click a direction in the list to position the manipulator.
-
-
-
Lock Manipulator: this option locks the manipulator selected axis of rotation.
-
Rotation options:
-
Rotation Free: allows you to rotate freely the light direction.
-
Rotation around X: allows you to rotate the light direction around the X axis only. In this case, only the red arrow of the manipulator indicating the center of the rotation is displayed.
-
Rotation around Y: allows you to rotate the light direction around the Y axis only. In this case, only the red arrow of the manipulator indicating the center of the rotation is displayed.
-
Rotation around Z: allows you to rotate the light direction around the Z axis only. In this case, only the red arrow of the manipulator indicating the center of the rotation is displayed.
-
Texture
-
Set the Thickness value to 30.
The thickness of single light band increases.
-
Set the Sharpness value to 30.
The sharpness of single light band decreases.

-
Set the Brilliance value to 80.
The brilliance of single light band increases.
-
Set the Diffusion value to 80.
The diffusion of single light band increases.

Color
-
Set the Hue value to 120.
The hue of single light band decreases.

-
Set the Saturation value to 120.
The saturation of single light band decreases.

-
Set the Max L value to 80.
The maximal luminance of single light band increases.

-
Set the Min L value to 10.
The minimal luminance of single light band increases.