![]()
This section deals with:
About Defining Laws Using a 2D Curve
In DMU Kinematics Simulator, when the user wants to pilot the remaining degrees of freedom of a mechanism, it is possible to define laws on the kinematics commands. This can be done by creating a knowledge formula or a rule (if the law is defined by intervals).
![]()
This new capability allows the user to define laws using a 2D curve and
editing them graphically
How to access this capability?
|
Using Law Management option buttons in the Command Edition dialog box:
|
Through the Command Edition dialog box, the user can perform various operations:
Option Buttons Description
Import: Imports the coordinates of points describing a kinematics law. These coordinates must be contained in a specific formatted text file.
Display: Visualizes a graphic representation of the currently edited command. It is a simple and read-only browser and it does not allow editing the curve. The Laws Display window is similar to the one existing in Mechanism Analysis except there is only a representation of the edited command (In Mechanism Analysis function, all the commands are represented within the same graph).
Edit: Edits the sketch
associated to the current law. The system automatically switches to the
sketcher editor, where the user can perform all the necessary changes on
the sketch. (Specific licensing)
Once the edition is finished, the user clicks on the Exit workbench button
to switch back to DMU Kinematics workbench.
The changes that have been made on the sketch are automatically taken into account by the kinematics law. No update is necessary. If the modification of the sketch leads to an invalid law description (i.e. the sketch does not represent a function), an error message is displayed and the modifications on the sketch are undone.
Link:
Links a command to an already existing
sketch.
This can be useful for designers who create laws directly with the sketcher
without using the Import function. When clicking on the Link button, the
user needs to select an existing sketch contained in the current document
(i.e. in a CATPart inserted under the root product which contains the
kinematics data, not in another document).
Unlink: Breaks the link
between a command and its associated sketch.
It can be useful if the user wants to remove the associated law to a
command.
License Requirements
Important: The Edit functionality is available provided that you have at least one of the following licenses: GS1, PD1, GSD or PDG license.
Importing Kinematics laws from a text file
(Step-by-Step Scenario)
Open the Engine_import.CATProduct document.
![]()
-
Double-click command 1 in the specification tree to edit it. The Command Edition dialog box is displayed.
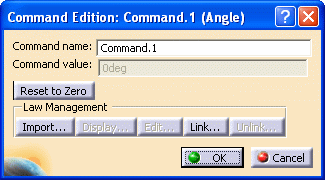
 By default, only Import and Links buttons are
available..
By default, only Import and Links buttons are
available.. -
Click the Import button. The File Selection dialog box is displayed
-
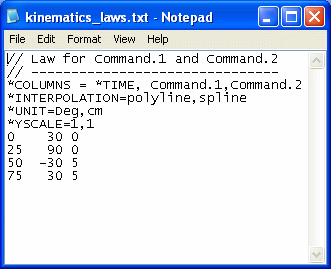
Select the appropriate file for the law definition. In our example, select kinematics_laws.txt in the samples folder.
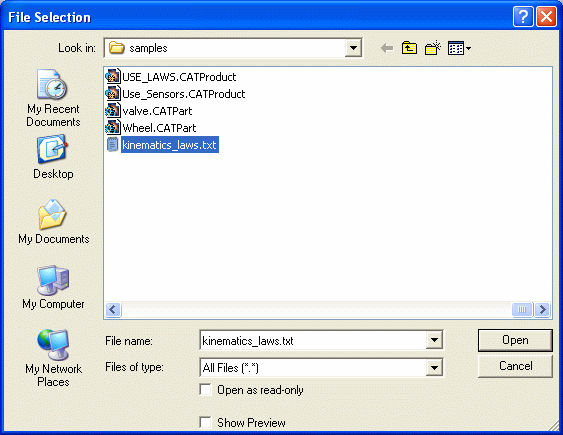
This file allows creating two laws (one law per command).
-
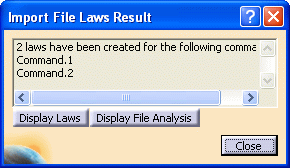
Click Open. The Import File laws Result dialog box is displayed.
-
Click Display Laws button:
The Laws Display window is displayed:
Click the command on the left area to display the corresponding graphical representation.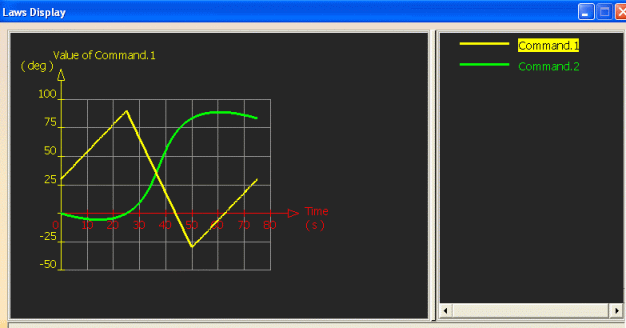
-
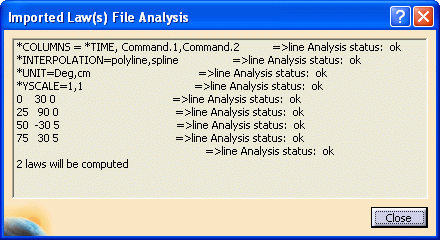
Click Display File Analysis button.
The Imported Laws File Analysis dialog box is displayed:
-
Click on the Close button in the Import File Laws Results then in Import File laws Result dialog box to exit the Import functionality.

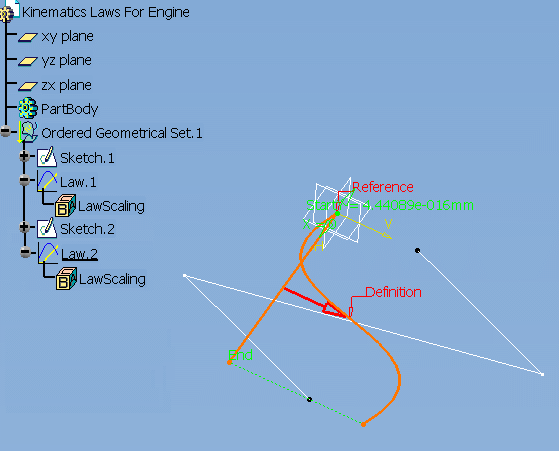
Note that a new Part KinematicLaws_For_Engine is created and hidden.

-
Open the created Part in a new CATIA window. For this:
Right-click the Part in the specification tree and select Open in New Window in the contextual menu displayed 
For instance, if you double-click Law.2 in the specification tree this what you obtain:
Notes:
-
The import result is an ordered geometrical set.
-
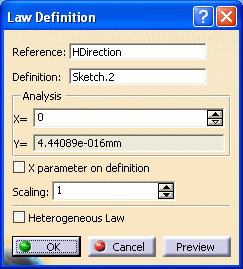
The origin of the curve is the origin of the sketch, i.e. the intersection of H and V axis. Concerning the GSD Laws (Law.1, Laws.2), the Reference field is the H direction and Definition field is the sketch.
-
These Generative Shape Design laws help creating formulas defining laws for each command. Two Knowledge formulas with Command.1 and Command.2 names have been created:
- If a formula already exists for a given command, this formula is replaced by the new one.
- If in the current CATIA session, there is a CATPart document which already contains sketches of kinematics laws, no new Part will be created. All the new sketches and the new GSD laws will be created on this Part.
-
Associating a 2D curve to a kinematics
law
The link button allows you to create a law from an existing sketch. This sketch should be contained in a CATPart document inserted under the product of mechanism.
-
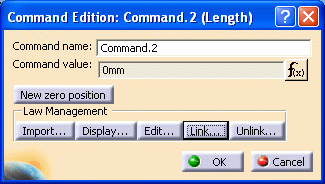
Double-click command 2 in the specification tree to edit it. The Command Edition: Command.2 (length) dialog box is displayed.
-
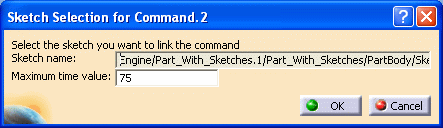
Click the Link button. The Sketch Selection for Command.2 dialog box is displayed.
-
Select the sketch of interest in the specification tree.
The name of the sketch appears in the dedicated field:
-
Click Ok in the Sketch Selection for Command.2 dialog box.
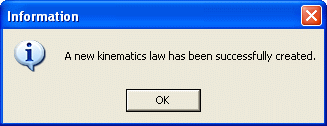
Now, the law of the command is driven by the selected sketch and a new formula representing the law has been created.

-
Click the Unlink button to break the link between the command and its corresponding sketch.

-
Click Ok to confirm your operation. The formula representing the kinematics law is deleted
Editing graphical laws
|
|
The Edit functionality is available only if you have at least one of the following licenses: GS1, PD1, GSD or PDG. |
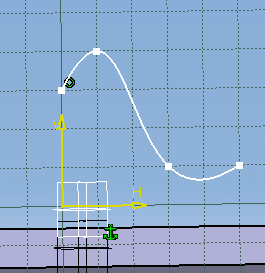
If a command is already associated to a sketch, you can edit this sketch at any time. All you need to do is:
-
Click the Edit button in the Command Edition dialog box. The Sketcher workbench automatically opens:
For more information about Sketcher, refer to the Sketcher User's Guide
-
Modify any point of the curve.
-
When you are done, click Exit Workbench
 to switch to the Kinematics Simulator workbench. The Modifications are
taken into account in the corresponding kinematics law.
to switch to the Kinematics Simulator workbench. The Modifications are
taken into account in the corresponding kinematics law. -
Click Close.
![]()