The information in this section will help you create and edit Groove Turning operations in your manufacturing program.
The Groove Turning operation allows you to machine a groove by a series of plunging cuts. You can specify:
The following topics are dealt with in the paragraphs below:
The following tooling may be used:
Note that the following attributes may influence machining (they are located on the Insert-holder's Technology tab):
These attributes take tooling accessibility into account and may reduce the machined
area.
However, you can use the Insert-Holder Constraints option on the operation
editor to either ignore or apply these tooling attributes. You can replay the operation
to verify the influence of these attributes on the generated tool path.
Notes:
Part and Stock profiles are required. They can be specified as follows:
The following Orientations are proposed: internal, external, frontal and inclined. The selected Orientation defines the type of geometric relimitation to be done between the stock and part geometry in order to determine the area to machine. For an inclined orientation you must specify the Angle of Incline.
Offsets can be positive or negative with any absolute value. The global offset applied to the part profile is the resulting value of the normal, axial and radial offsets.
In grooving, the part profile usually needs to have flanks at the both ends of the profile. But in some cases you can define geometry with single flank. Such a geometric selection is referred as an open-ended groove.
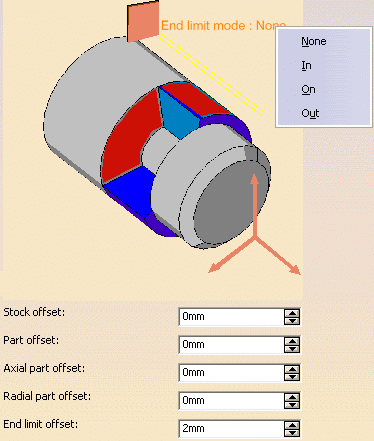
In case of a Groove Turning operation for an open-ended groove, one end is limited by flank and the second end limit of the profile geometry is considered till the selected geometric end element. If you need to restrict the end to a different location, then the selected geometry for this purpose is referred to as End Relimiting Elements. The option that is used to select this element is called as End Limit.
End Limit option allows you to specify a point, line, curve or face to relimit or extrapolate the selected part profile. If a face is specified, the end element is the intersection of the face and the working plane. The position of the end of machining is defined with respect to this element by one of the following settings: None / In / On / Out.
End limit offset: distance with respect to the end element (only if end element is a line or a curve, and when In or Out is set for end element positioning).
If you wants to limit the path at the open end, the End Limit Offset option helps in defining end limit element. When you select the End Limit, a message comes Click to select an End Re-limiting Element.
Once End Relimiting element is selected it is highlighted and the tool path is computed till the end limit element. The new tool path will be as shown below.
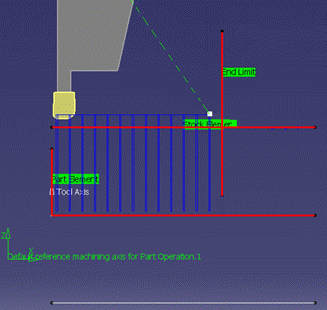
The End Limit has an influence on the specified Strategy tab settings.
Case 1: With reference to the above geometry, if the selected strategy options are:
In this case the tool path will be defined from centre to flank, then from centre to end element.
Case 2: With reference to the above geometry, if the selected strategy options are:
In this case the tool path will be defined from flank to centre, then from end element to centre.
If First Plunge Position is set to Center, the Single plunge option is available. This is suitable for machining a narrow groove, possibly using the Grooving by level and Chip break options. Note that in this case Part Contouring is not available.
These options allow penetration into the workpiece at a reduced feedrate in order to prevent tool damage. Once the attack distance has been run through, the tool moves at machining feedrate.
When tool motion between two passes is in contact with the part profile, in order to avoid collisions the corresponding feed is the lift-off feedrate and not RAPID.
then you can give a Machining Speed value.
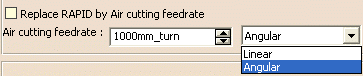
The following feedrates can be set to either Angular units (length per revolution) or Linear units (length per minute):
Feedrates are also available for air cutting trajectories such as macro motions
and path transitions.
Note that RAPID feedrate can be replaced by Air cutting feedrate in tool trajectories
(except in macros) by selecting the checkbox in the Feed and Speeds tab page
![]() .
.
Dwell setting indicates whether the tool dwell at the end of a path or a plunge is to be set in seconds or a number of spindle revolutions.
Please note that decimal values can be used for the number of revolutions. For example, when machining big parts that have a large volume, it can be useful to specify a dwell using a value of less than one revolution (0.25, for example).
You can select a tool compensation number corresponding to the desired tool output point. Note that the usable compensation numbers are defined on the tool assembly linked to the machining operation. If you do not select a tool compensation number, the output point corresponding to type P9 will be used by default.
Note that the change
of output point is managed automatically if you set the
Change Output Point option.
If the output point is consistent with the flank of the groove to be machined, the
output point is changed when the other flank of the groove is machined.
At the end of the operation, the output point is the same as it was at the start
of the operation. See Changing
the Output Point for more information.
The following Approach
and Retract macro modes are proposed: Direct, Axial-radial,
Radial-axial, and Build by user.
The selected macro type (Approach or Retract) defines
the tool motion before or after machining.
Various feedrates are available for the approach and retract motions (RAPID, lead-in, lift-off, and so on). Local feedrates can be set to either Angular units (length per revolution) or Linear units (length per minute).
See Define Macros on a Turning Operation for more information.
Linking macros, which comprise retract and approach motion can also be used on
Groove Turning operations.
Approach and retract motions of linking macros are interruptible.
For Groove Turning only, you can
interrupt the macro at the end of the number of specified levels. See
Interruptible Macros for more information.
It can be useful to interrupt an operation when the foreseeable lifetime of the insert is not long enough to complete the machining.
Groove turning can be done in one or more levels using the Grooving by Level mode. Also, you can define Linking macros and define interrupt modes of these macros.
Prior to Release 18, if the Linking macro is interrupted at the end of a level, the macro returns to the previous tool path and not to the next cutting motion.
As from Release 18, the macro returns to the next cutting position in the toolpath after retract from interruption at the end of a level.
A Linking macro returning to previous tool position and then moving to the next cutting position is considered a redundant move. As from Release 18, such redundant moves are avoided.
