|
|
This
task shows how to create a machining
process containing a sequence of axial machining operations: Spot
Drilling, Drilling, and Tapping.
For each operation you can associate Knowledgeware expressions such as formula and checks and specify a tooling query. This enables to establish relations on data such as features, machines, and tools that are not yet known at machining process build time. For example, you can use this capability to determine the depth of cut from the hole depth. In addition, you can use f(x) capability to link the various parameters of machining operations. For example, for an machining process where a rework phase follows a roughing phase, the offsets of the rework can be determined from the offsets used in the roughing step. For more information about these capabilities, refer to Knowledgeware and Machining Processes. |
|
|
|
Select
a Machining workbench from the Start menu. No CATPart or CATProcess is
needed at this stage. If the Machining Process toolbar is not already displayed, select it using View > Toolbars. Make sure that Start Edit mode is set in Tools > Options > Machining > Operations. |
|
Initialize the Machining Process with Machining Operations |
||
|
|
1. |
Select Machining
Process View
|
| 2. |
Select Machining Process
|
|
| 3. | Select the Spot Drilling icon. The Spot Drilling dialog box appears. | |
|
|
At this stage you can set certain parameters such as feeds and speeds and machining strategy. However, there is only limited access to geometry parameters and it is not possible to specify a tool. | |
| 4. | Just click OK to add a reference Spot Drilling operation
to the machining process.
The reference operation has an associated Tooling Query. |
|
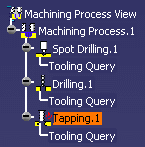
| 5. | In the same way add Drilling and Tapping operations to the
machining process by selecting first the Drilling icon then the Tapping
icon. The Machining Process View dialog box is updated as shown.
|
|
|
|
Note that any machining activity named according to the
structure String.number will be managed at instantiation time by
checking the unique name in a given program. This is an extension of the
standard mechanism for default names: Drilling.1 will give Drilling.1, then Drilling.2, and so on. So: MyOwnName.1 will give MyOwnName.1 then MyOwnName.2 and so on. However: MyOwnName will give MyownName then MyOwnName, and so on. |
|
Associate Formula to the Machining Operations |
||
| 6. | Right-click the Spot Drilling operation in the Machining
Process View and select Edit Formula. The Formula Editor
dialog box appears. Define a formula as shown below. It corresponds to
the following criteria:
|
|
| 7. |
Click OK to assign the formula to the Spot Drilling operation. You can assign formula to the Drilling and Tapping operations in the same way. |
|
Associate Checks to the Machining Operations |
||
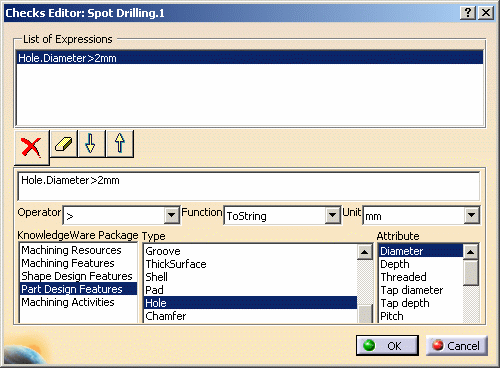
| 8. |
Right-click the Spot Drilling operation in the Machining Process View and select Edit Checks. The Checks Editor dialog box appears. Define a check as shown below. It corresponds to the
criteria:
You can assign checks to the Drilling and Tapping operations in the same way. |
|
Define Tool Queries for the Machining Operations |
||
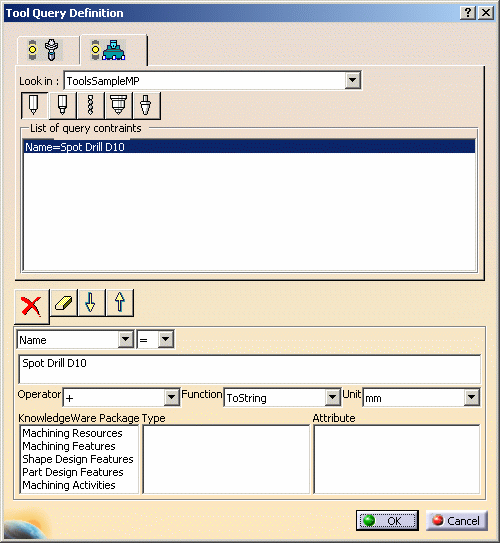
| 9. | Double-click the Tooling Query associated to the Spot
Drilling operation. The Tool Query Definition dialog box appears. Define
a simple tooling query as shown below. It corresponds to the criteria:
|
|
| 10. |
Click OK to assign the tooling query to the Spot Drilling operation. You can assign tool queries to the Drilling and Tapping operations in the same way (to find tools Drill D10.5 and Tap D12, for example). |
|
|
|
Through the Copy/Paste mechanism, you can manage more than one Tooling Query on an operation. When you instantiate the Machining Process, the first query is executed. If there is no tool found, the next query is executed and so on until a result is obtained or the last query is reached. This enables you to query several tool catalogs, different tool types, and have less constrained queries. | |
Save the Machining Process |
||
| 11. | Select File > Save As to save the machining process in a CATProcess document (called AxialMachiningProcess1.CATProcess, for example). | |
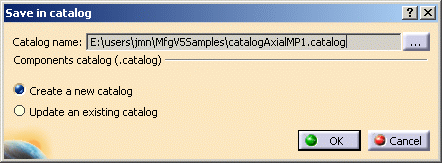
| 12. | Right-click the Machining Process in the Machining Process View and select Save in Catalog. | |
| The Save in Catalog dialog box appears. Click the [...]
button and specify a new catalog name (catalogAxialMP1.catalog, for
example).
Click OK to save the machining process as a component in the specified catalog. The following are initialized automatically:
However, you can change family or component in the Catalog Editor workbench. Click here to see how you can organize machining processes in a catalog using that workbench. |
||
| See Apply a Machining Process for information about applying machining processes to geometry such as design features and machining patterns. | ||
More About Creating Machining Processes
|
||
|
||
|
||
|
||
|
||
|
|
||