Auto-Sequence Operations in a Program

This task shows how to optimize the order of operations in a program according to pre-defined sequencing rules.
The Sequencing rules have been set up by the administrator. The Program settings under Tools > Options > Machining are described in Program settings.

Make sure that the document in the sequencing rules path is accessible in Read/Write.

A sample sequencing rules document is delivered with the product at the following location:
../startup/Manufacturing/samples/AutoSequence/AllSequencingRules.CATProduct.

1. Create a program containing the following operations.
2. Select Rules Manager to visualize the administrator's sequencing rule settings. Select Tools > Options > Machining > Options > Program > Access to sequencing rules settings, to enable Rules Manager.
 By default, Rules Manager icon is disabled.
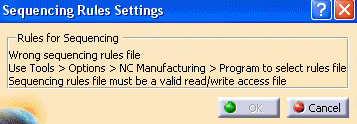
  3. If you get this error after selecting Rules Manager .

then AllSequencingRules.CATProduct file (CATProduct file set in Sequencing rules path text field) is not editable. Copy this file to a location where the DELMIA application can modify it. Give the modified path of the copied CATProduct file in Tools > Options > Machining > Program > Sequencing rules path text field.
  4. Absolute file path to a CATProduct (containing sequencing rules information), is set in Tools > Options > Machining > Options > Program > Sequencing Rules Path text field.
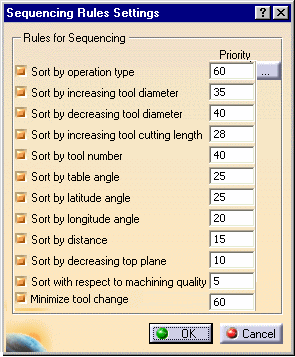
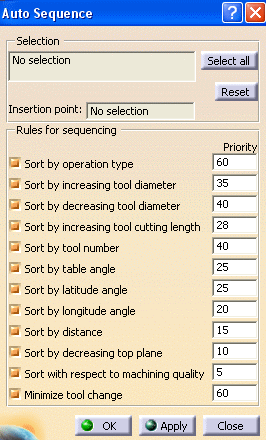
The sequencing rules specified in CATProduct are displayed in Sequencing Rules Setting dialog box. Select the required rules with priority in Sequencing Rules Settings panel for the same to be displayed in Auto Sequence dialog box. Only the rules selected in the Sequencing Rules Settings panel will be displayed in Auto Sequence dialog box:
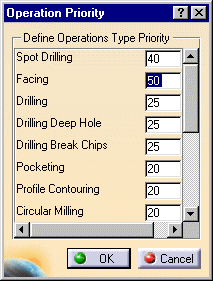
  • Click [...] button in Sequencing Rules Settings dialog box to visualize the sequencing priority between machining operations.
  • A new Sorting criteria based on QuickSort is introduced. The Minimize Tool Change is provided by default in Auto Sequence Panel if the same is already selected in Sequencing Rules Settings dialog box.


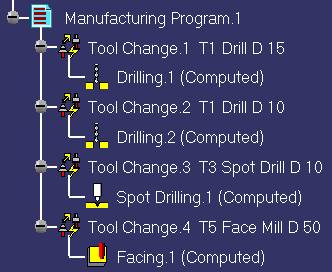
  With Minimize Tool Change criteria, according to its priority, machining operations using the same tool (or same tool assembly) can be grouped together, as shown below.

Sequencing of operation with minimal tool change criteria reduces the time required for sequencing a Machining program for any combination of rules selected in AutoSequence panel. This performance improvement is valid only for the 12 default sequencing rules. The time required for sequencing a Machining program will be more for user-defined sequencing rules. Default sequencing rules get executed sequentially, in order defined by their priority. While executing these rules, if system has to execute a user-defined rule, then for execution of this rule and of subsequent rules (with lower priority), system switches back to the previous system (old sorting).
4. Select Auto Sequence to display  the Auto Sequence dialog box. Click Select All button to select all the operations of the program. Click Apply to sequence the operations according to the defined rules and priorities.
5. The program is re-sequenced as follows.
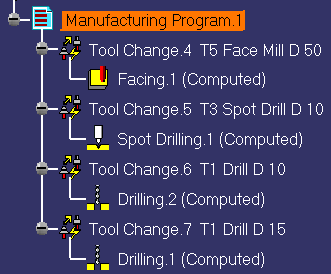
You can click Undo if you want to cancel the auto-sequence results.
  It is possible to impose a constraint (called strong precedence) to force a group operations to remain together after sequencing.

Applying a strong precedence constraint means that in addition to imposing an order between two operations A and B, it is not possible to have another operation C between them. The sequence A - C - B is not allowed, only A - B is allowed if a strong precedence exists between A and B.

For this, a parameter named Strong must be added to operation B.

For example, in auto-sequencing this could be used to prevent inserting a threading operation between a drilling operation and a reaming operation.

Machining axis changes are taken into account in auto-sequencing without having to impose strong precedence criteria.