Defining Tool and Work-piece Mount Points 

This section describes how to create, modify and delete tool and work-piece mount points on milling machines using the Create Mount Point command.

This command can also be used in the context of older milling machines (created till Release 18). This will migrate the existing data, and the document will no longer have the NC Controller node and tool/work-piece mount point nodes in the Product tree. However, if you do not want to migrate the existing data, you can continue to use the existing milling machine functionality.

For new machines, the existing milling machine functionality is completely replaced by the Create Mount Point command.

Open an existing milling machine.

  1. Click Create Mount Point .

    This command completely substitutes the functionality provided in older milling machines (machines created till Release 18), by work-piece and tool mount nodes under the NC Controller in the product tree.

    For older milling machines, you will be prompted to migrate the existing data to the current release.

    You may choose one of the following options:

    • Yes - This migrates the NC machine data enabling the use of interchangeable milling heads.

      The NC Controller node will no longer appear in the Product tree, and the Mount Point Management dialog box opens. The corresponding mount point data appears in the Mount Points area. You can create, modify or delete mount points using this command.

    • No - The Create Mount Point command aborts.

      You can continue to use the existing milling machine functionality without the ability to use interchangeable heads.
      The Workpiece Mount and Tool Mount nodes are retained under the NC Controller node.

  2. Select Yes, to open the Mount Point Management dialog box.

    On the top of this dialog box is the Mount Point Type drop-down box, which contains the following options:

    • Tool Mount Points

    • WorkPiece Mount Points

    • Head Mount Points - It is the point defined on the milling machine, where the interchangeable head is to be mounted. The Head Mount Point must be defined if you want to use interchangeable milling heads in the milling machine.

    The Tool Mount Points option is selected by default.

    Below this drop-down is a text-selection box, Mount Points, that lists the tool and work-piece mount points defined on the context product.

    Highlighting on any item in the list, will highlight the corresponding representation in the 3D viewer.

    Creating a Mount Point

  3. Click New, to create a mount point of the type selected in the drop-down menu.

    The Station Name dialog box appears.

  4. Enter the Mount Station Name, and click OK.

    The compass snaps to the root-product of the milling machine.

    Clicking Cancel will cancel the entire interaction.

  5. Manipulate the compass, using the standard compass interaction techniques, to position the compass at the appropriate position.

    The compass can also be positioned using Frames of Interest .

    For more details on using Frames of interest, See Defining Machine Kinematics Using Construction Entities.
  6. Select the part on which this mount point is to be associated, and click OK on the Set Location dialog box that appears.

    Make sure a new item appears in the Mount Points text-selection area.

  7. Repeat the above steps to define multiple tool mount points, all of which will be listed in the Mount Points area.

    Modifying a Mount Point

  8. To modify an existing mount point, in the selection list, select one of the tool mount points and click Modify.

  9. Edit the mount point name in Station Name dialog box, if required.

    The compass snaps to the currently defined mount point.

  10. Place the compass appropriately.

  11. Select the part on which this mount point is to be associated, and Click OK in the Set Location dialog box that appears.

    Deleting a Mount Point

  12. To delete an existing mount point, in the selection list, select one of the tool mount points and click Delete.

    The selected tool mount point disappears from the text-selection area.

  13. Repeat the above steps for defining Work-piece mount points, by selecting WorkPiece Mount Points from the Mount Point Type drop-down menu.

In milling machines, you can have different tool change positions for different tool mount points. To facilitate this, a new drop-down is added to the current Tool Change Position User Interface.

The Jog dialog box includes a new drop-down box, Mount Point Name, in the Applicative frame, which lists all the tool mount points created on the milling machine.

Using this, you can associate a specific tool change position for each tool mount point.

Mount points on imported D5 Machines cannot be created or managed with this command.


Modifying Workpiece and Tool Mount nodes under the NC Controller

Open the V4Axis_Machine.CATProduct file.

In addition:

  1. On the specification tree, select Workpiece Mount Point.

    The system prompts you to select a part.
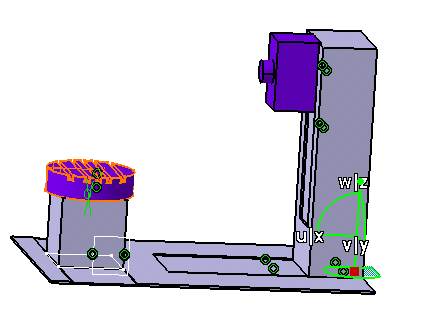
  2. On the specification tree, select CTable.

    The corresponding geometry in the graphics area gets highlighted. The green compass is also positioned at the origin of the machine.
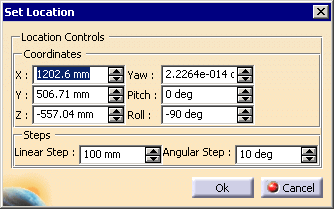
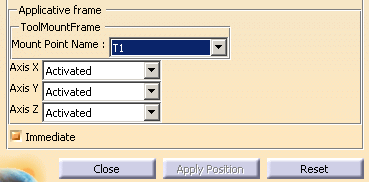
    The Set Location dialog box appears.
  3. Use the red center of the compass to drag and drop it on the selected CTable product, or use the above dialog box to position the compass on the selected workpiece mount part.

  4. Click OK.

    The CTable is now the workpiece mount part with the point described in the Set Location dialog box set to the workpiece mount point.

    You can modify this location at any time by repeating the above procedure.

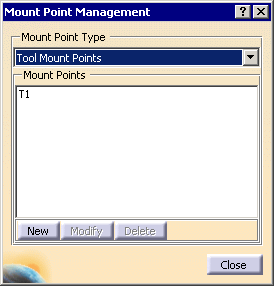
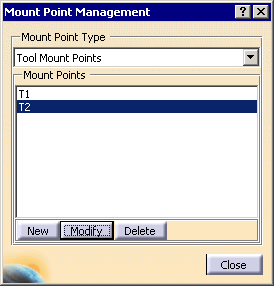
  5. Repeat the above steps, for Tool Mount Point, selecting ZAxis instead of CTable.

    The ZAxis is now the tool mount part, with the point described in the Set Location dialog box, set to the tool mount point.

    You can modify this location at any time by repeating the above procedure.

  6. Jog the machine to validate the automatically assigned inverse kinematics solver, by clicking Jog Mechanism .

    See Jogging a Mechanism.