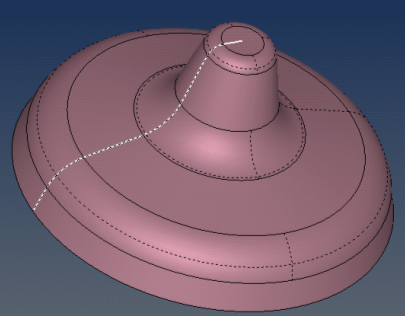
The information in this section will help you create and edit ZLevel operations in your Manufacturing Program.
Click ZLevel
![]() ,
then select the geometry
to be machined
,
then select the geometry
to be machined ![]() .
.
A number of strategy parameters are available:
- in the Machining tab to define:
- the Machining tolerance,
- the Cutting mode,
- the Machining mode,
- the Pass overlap,
- and activate the 3/5-Axis Converter
- in the Axial tab:
- to define the Stepover type,
- to define the Maximum distance or the Minimum distance between pass or the Scallop height.
- in the Zone tab to define:
- in the HSM tab,
- in the Output tab (when a Machine has been defined at Part Operation level, with the option 2D circular interpol. in the Numerical Control tab)
Note that:
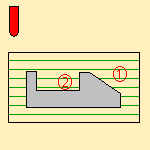
- the TSlotter tool is defined with one corner radius only, the upper corner radius being equal to the corner radius,
- the TSlotter takes into account a 2D projection of the limiting
contour:
The limit is considered to be a prism parallel to the tool axis and passing through the limiting contour (shown in green below).
You can also define the feedrates and spindle speeds
![]() and transition paths in your machining operations by
means of NC macros
and transition paths in your machining operations by
means of NC macros
![]() as needed.
as needed.
See also macro parameters specific to ZLevel.
ZLevel: Strategy parameters
-
The ZLevel strategy parameters are distributed into 4
tabs.
By default, all 4 tabs are displayed with all their parameters.
However, most operations only require a reduced list of those parameters. -
Click <<Less to display only those parameters.
The Zone tab is hidden, as well as the Pass overlap parameter in the Machining tab. - Click More>> to re-display all parameters.
- You can also use the modal option
User
Interface Simplified mode in the
Tools > Options > Machining > Operation tab. -
By default, all tabs and all parameters are displayed:
-
Click <<Less to display a reduced list of tabs and parameters:
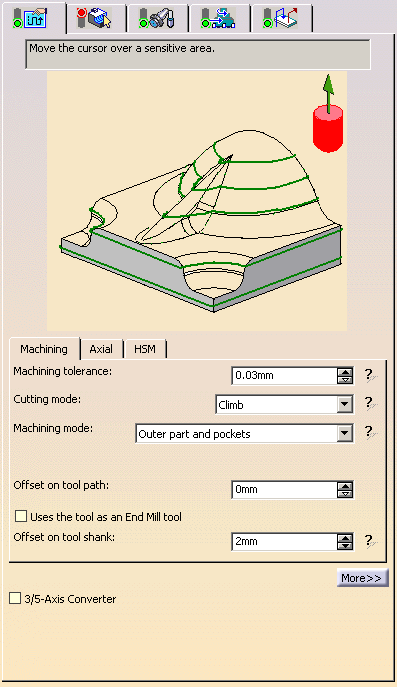
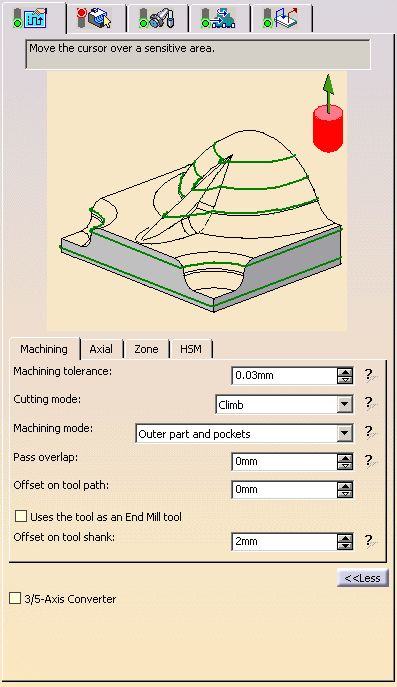
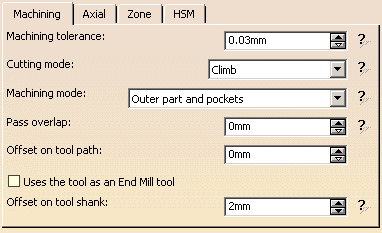
ZLevel: Machining tab
-
By default, or when the More>> button is pressed:
-
When the <<Less button is pressed:

Machining tolerance:
Maximum allowed distance between the theoretical and
computed tool path.
Consider it to be the acceptable chord error.
Cutting mode:
Specifies the position of the tool regarding the surface to be machined.
It can be:
- Climb

- Conventional

- Either.
Machining mode:
Defines the type of area to be machined:
- By plane; the whole part is machined plane by plane,

- Pockets only; only pockets on the part are machined,
- Outer part; only the outside of the part is machined,

- Outer part & pockets; the whole part is machined external
area by external area and pocket by pocket.
Pass overlap:
Hidden when the <<Less button is pressed.
It is the width of the overlap of
the end of a pass over its beginning.
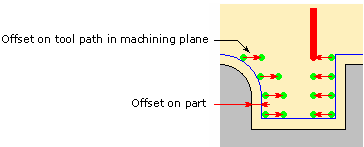
Offset on tool path:
lets you add an offset on tool path in the machining plane.
The value of this offset is always positive and is added to the offset on
part.
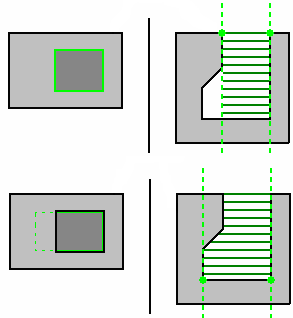
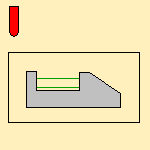
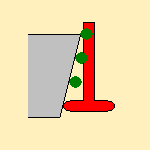
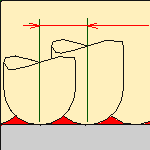
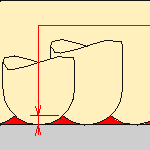
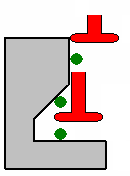
Use the tool as End Mill tool:
available when you have selected a TSlotter
tool.
When this check box is not selected, you use the TSlotter tool as such, i.e.
you can machine undercut area:
When this option is selected, you use the TSlotter as an End Mill tool, i.e.
you will not machine undercut area:
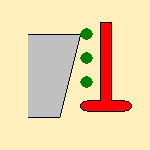
(The green dots represent the passes in ZLevel)
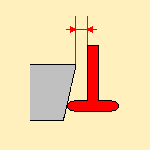
Offset on tool shank:
available when you have selected a TSlotter
tool.
It defines the distance within which the tool shank is considered to be in
collision.
Click here for information about the 3/5-Axis Converter option.
ZLevel: Axial parameters
All parameters remain displayed in the <<Less mode.
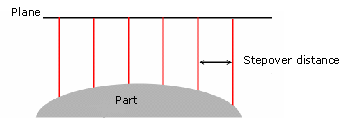
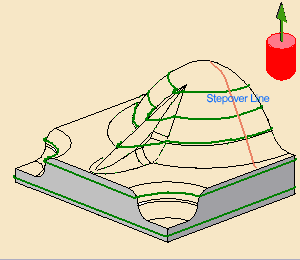
Stepover
- Constant
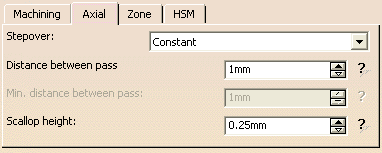
Constant has a constant stepover distance defined in a plane and projected onto the part.
You can modify:- the Maximum distance
between passes
- and the Scallop height
If you enter a Scallop height, the Distance between pass is computed automatically.
- the Maximum distance
between passes
- Via Scallop Height
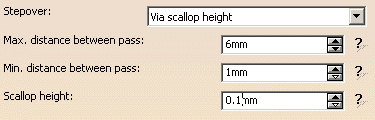
The stepover is computed from the scallop height you have set,
within the range defined by Max. distance between pass and Min. distance between pass.

All selected geometries are taken into account in the stepover computation even if these geometries are not milled.
For example, filled holes or vertical walls outside the limiting contour influence the stepover computation and
may generate useless paths. The by-pass consists in not selecting these useless geometries to compute the toolpath. - Distance on
contour
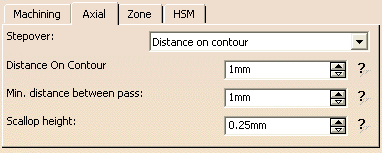
This stepover mode completes the Via Scallop Height stepover when the part to machine results
from a section revolution, with small structures.Example: The whole part has a sharp slope but because of a small structure on one side, the Z-pitch becomes very small. It has an impact on the finishing. 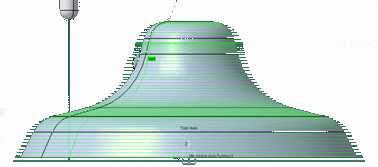
Distance on contour lets you select:
- a contour, i.e. the section of revolution by clicking the
Stepover Line in the sensitive icon
and using the
edge selection toolbar.
- and a Distance On Contour which will define
points on this contour, and thus a list of Z-level values.
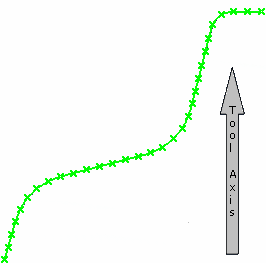
- The Z-pitches values are the Z-level values resulting from the projection of each point of the tool axis.
- The Min. distance between pass value allows
filtering the resulting points.
It gives the minimum value between the Z-pitches values.- if several points define a segment perpendicular to the Tool Axis, only 1 point is taken into account.
- Z-level values are ordered along the Tool Axis, and this order depends on the contour orientation.
- If the part is a solid of revolution, it is strongly
recommended to define the contour as the half-section of the
part.
If the contour is the whole section of the part, most of the distance values on the Contour will double the number .Yes
No

Sometimes, the Z-level values are very close: - when a mandatory plane is defined near a Z-level resulting value,
- when the part presents a nearly flat geometry followed by a
nearly vertical geometry.
Near the flat geometry, the Z-level values will be very close.
In those cases, the Z-level values are automatically filtered by the tolerance value or
by the Min distance between pass (when this parameter has a higher value than the tolerance).- Computation is impossible:
- if the contour is a line perpendicular to the Tool Axis, an error message is displayed,
- if the contour is a closed curve and the Min distance between pass is greater than the curve length,
- if the projected points of the contour are not contained by the bounding box of the part,
- if the contour is not continuous,
- if the Min distance between pass is greater than the Z-level values of the bounding box.
- a contour, i.e. the section of revolution by clicking the
Stepover Line in the sensitive icon
and using the
edge selection toolbar.
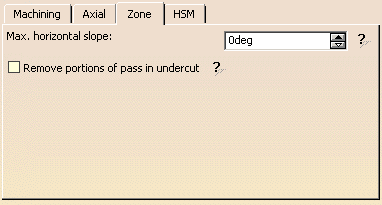
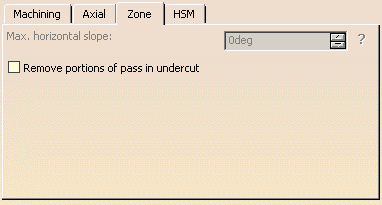
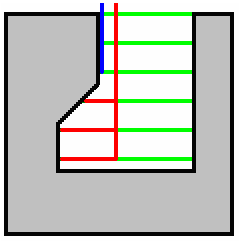
ZLevel: Zone parameters
This tab is hidden when the <<Less button is pressed.
It looks like this with a Conical tool or a End Mill tool or a TSlotter
used as an End Mill tool is selected:
and to the following when TSlotter tool (not used as an End Mill
tool) is selected.
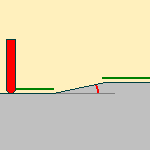
Max. horizontal slope
maximum slope that can be considered to be horizontal (any area that is
considered to be horizontal will not be machined).
-
Use this parameter to define slope areas if you need a quick tool path computation.
However, this computation may not be accurate since some parts of the tool movements may be considered
as vertical although they are in horizontal areas. -
If you require an accurate tool path computation, we recommend that you define the slope areas with
the Machining/Slope Area action before entering the ZLevel action.
since it is managed in the feature itself.
Remove portions of pass in undercut
when this check box is selected, the portions of the passes in
undercut condition are removed:
End Mill tool:
- The check box is not selected:

- The check box is selected:
TSlotter tool:
- The check box is not selected:
- The check box is selected:

The dialog box displays additional parameters (with End Mill
or conical tools):
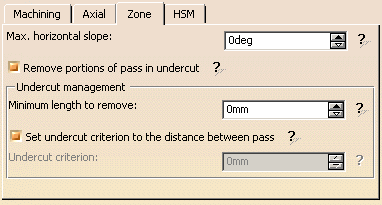
Minimum length to remove:
lets you define the minimum length of the portions
of passes in undercut situation to remove.
Set undercut criterion to the distance between pass
the undercut criterion is the minimum distance between the tool
and the part to consider that the portion of pass is in an undercut
situation.
When this check box is selected, the undercut criterion value is set automatically to that of the distance between pass, i.e.:
- Distance between pass when Stepover is set to Constant,
- Max. distance between pass when Stepover is set to Via scallop height,
- Distance on Contour when Stepover is set to Distance on contour.
When cleared, you must key in a undercut criterion value.
ZLevel:High Speed Milling tab
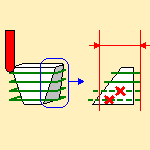
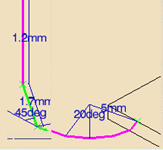
All parameters remain displayed in the <<Less mode.

Corner
radius
defines the radius of the rounded ends of passes.
The ends are rounded to give a smoother path that is machined much faster.
ZLevel: Output tab
This tab becomes available when you have selected a Machine
at Part Operation level, and selected the option 2D circular
interpol. in its Numerical Control tab:
The Output tab looks like this (its contents may vary
according to the options you have selected):

Select the Circular Interpolation check box when you
require one.
The arc interpolation output is possible:
- When the tool is in contact with a revolution surface with its axis parallel to the tool axis,
- In the cornerization circular path,
- and in circular motions of the macro.
In the other cases, you can approximate the tool passes to optimize a circular interpolation by selecting the corresponding check box.
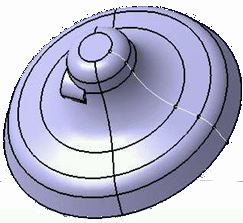
ZLevel: Geometry
You can specify the following geometry:- Part with possible Offset on Part (double-click the label)
- Check element with possible Offset on check (double-click
the label).
he check is often a clamp that holds the part and therefore is not an area to be machined.
The tool path quality is improved if check surfaces are selected.
- Area to avoid (small
light brown corner near the part selection area).
This is in fact a list of faces removed from from the list of faces built from the Part.
Those removed faces are not taken into account to compute the tool path.
Use Area to avoid for a quick definition of a sub-element of the Part you want to machine.
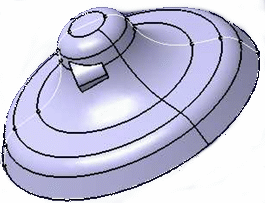
For example, you want to machine the Part below, but not its pocket.
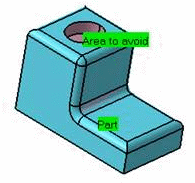
To do so:- select the whole part as the Part,
- then define the Area to avoid by selecting the faces of the pocket.
A longer alternative would be to define the Part face by face.
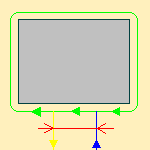
- Safety plane.
The safety plane is the plane that the tool will rise to at the end of the tool path in order to avoid collisions with the part.
You can also define a new safety plane with the Offset option in the safety plane contextual menu.
The new plane will be offset from the original by the distance that you enter in the dialog box along
the normal to the safety plane. If the safety plane normal and the tool axis have opposed directions,
the direction of the safety plane normal is inverted to ensure that the safety plane is not inside the part to machine.

- Top plane which defines the highest plane that will be machined on the part,
- Bottom plane which defines the lowest plane that will be
machined on the part,
In standard cases, the part will be machined from the upper plane to the lower plane, i.e. from top to bottom.
If you want to machine the part from the lower plane to the upper plane,
simply enter the lower plane as the top plane and the upper plane as the bottom plane.
- Imposed plane that the tool must obligatorily pass through.
Use this option if the part that you are going to machine has a particular shape (a groove or a step)
that you want to be sure will be cut.To use planar surfaces of a part as imposed planes: - Select the planar surfaces,
- Select Offset in the contextual menu and enter a
value equal to the
machining tolerance + the offset value on part (if any):- If the machining tolerance is 0.1 mm, and there is no offset
on part,
you will enter 0.1 mm as offset for the imposed plane. - If the machining tolerance is 0.1 mm, and the offset on part
is 1 mm,
you will enter 1.1 mm as offset for the imposed plane.
- If the machining tolerance is 0.1 mm, and there is no offset
on part,
This ensures that the imposed planar surface is respected to within the offset and tolerance values.
- Start point(s) where the tool will start cutting. There are
specific conditions for start points:
- You can select several Start points.
- The function tries to select a start point convenient for each
set of contours (islands or pockets).
if this point exists, it is used for each contour of the set. - The group of areas (pockets or islands) affected by a start
point are determined as follows:
- The nearest group of areas is affected by the Start point. In the image below, GZ1 is the nearest group.
- This defines a minimum distance Dmin in the image below and a first circle with a radius equal to Dmin.
- Let's draw a second circle with a radius equal to Dmin+Tool Diameter.
- All the groups at least partially located within the zone
defined by those two circles are affected by the Start point.
In the image below, the group GZ2 is located in that zone, thus it is affected by the Start points.
GZ3 and GZ4 are not located within that zone, thus they are not affected by the Start point.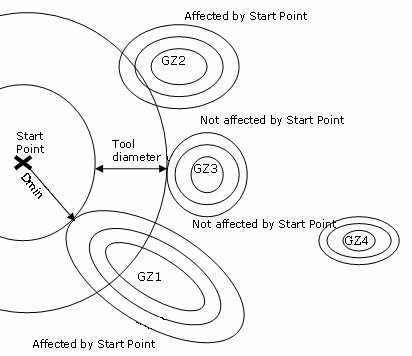
- There is no restriction regarding the position of the Start
points selected.
They can be taken anywhere, even on the part, since only the distance between the group of areas and
the Start point determines whether the pocket or the island is affected by the Start point.
- Limiting contour which is the contour that defines the
outer machining limit on the part.
You can also use the Part Autolimit option, with the Side to machine, Stop position, Stop mode and Offset parameters.If you have selected a single face to be machined and you are not using Part autolimit, the tool will machine both sides of the face.
If you use Part autolimit, the tool will stop when it reaches the edge of the face (as shown below).
If you are editing a rework or a slope area, an additional information is displayed,
indicating which type of subset you are working on.
This field is not editable (you can not go from one subset to another).
Info
When pressed, gives the details on the parameters that were defined with
the rework area.
![]()
Appears when invalid faces have been detected.
This message disappears when you close the dialog box or when the next
computation is successful.
![]()
Appears when invalid faces have been detected and when you have decided
to ignore them.
This message remains displayed as a warning.
Click the text to switch from one status to the other.
Please refer to the Basic Task - Selecting Geometric Components to learn how to select the geometry.
Macros
General information about macros can be found in
NC Macros.
Information about the operating mode can be found in
Defining Macros.
Information about Surface Machining macro parameters can be found in
Macro Parameters.
To avoid inconsistencies, ZLevel operations offer only the relevant macros:
- Approach,
- Retract,
- Linking Retract,
- Linking Approach,
- Clearance,
- Between passes,
and their associated machining modes:
- Along tool axis,
- Along a vector
- To a point (only in the build by user mode),
- Circular, (with the angular sector not exceeding 180 degrees),
- Circular or ramping, (with the angular sector not exceeding 180 degrees),
- Ramping, (with the angular sector not exceeding 180 degrees),
- Prolonged movement,
- Defined by Approach/Retract (for Between passes only)
For the same reason, the items of the contextual menu may be limited to the relevant ones.
Note also that:
- If the defined motion does not belong to the Z plane, the normal projection of the motion is taken into account.
- For To a point, if the point is defined inside the material, the tool path cannot be computed, an error message is displayed.
- In the Defined by Approach/Retract mode, the between pass motion is replaced by a linking retract motion and a linking approach motion.
- If a collision occurs, the macro elementary motion is not inserted into the tool path.
- It can happen that the whole macro is in collision. In that case, an
Along tool axis macro is inserted with a specific length
computed from the original macro parameters.
The feedrate used for this Along tool axis motion is :- the approach feedrate for an approach macro,
- the retract feedrate for a retract macro.
- If PPWord is selected, it will not be taken into account to determine if an Along Tool Axis macro will replace the non-computed macro you have selected.
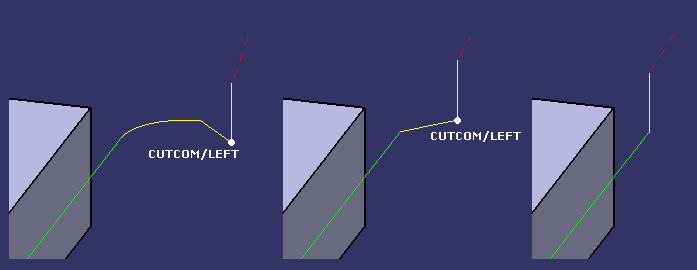
NC_CUTCOM_ON instruction
The NC instruction NC_CUTCOM_ON can be inserted in the approach macros of the ZLevel operations. This instruction will be replaced by the NC instruction:
- NC_CUTCOM_LEFT, if the Cutting Mode parameter is Conventional,
- NC_CUTCOM_RIGHT, if the Cutting Mode parameter is Climb.
- This instruction will not be replaced, if the Cutting Mode parameter is Either.
In Z-Level operation, the macro motions are transformed in case of collision:
- HSM mode (3 motions) is transformed to circular mode (3 motions),
- Circular mode (3 motions) is transformed to prolonged movement mode (2 motions),
- Prolonged movement mode is transformed to ramping mode (2 motions),
- Ramping mode is transformed to axial mode (1 motion).
How to manage PPwords, in case of collisions?

Solution 1: Allow PPword only at beginning [A] and end [D] of the macro (not between motions [B] [C]).
Solution 2: (preferred):
- HSM => Circular: [C] [D] PP words of HSM motion are on Circular motion,
- Circular => PSM: [B] and [C] are merged,
- PSM => Ramping: [B] and [C] are merged,
- Ramping => Axial: [A], [B] and [C] are merged.
Management of the NC_CUTCOM instruction:
For the axial motion, the NC_CUTCOM instruction will be removed.
A warning message is displayed if the number of NC_CUTCOM_OFF instructions
is different than the number of NC_CUTCOM_ON instructions.
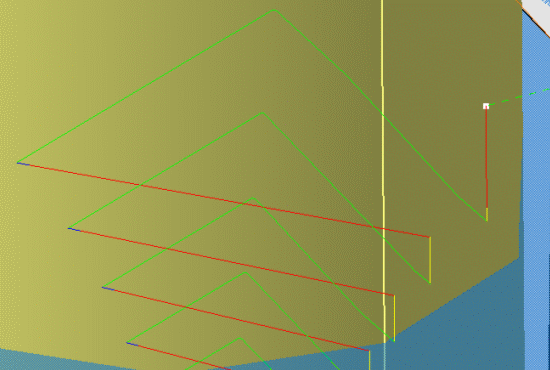
TSlotter Tool
All the macros are proposed:
- Along Tool Axis
- Along a vector
- Circular
- Ramping
- Prolonged movement (PSM)
- High Speed Milling
If a collision occurs, the macro motions are transformed to Axial
+ Radial motions without collision:
Example:
the macros defined as approach, retract and between pass are along
tool axis macros.
The macro motion in blue is in collision.
It is replaced by the motions in red.
When a TSlotter tool is selected to compute a ZLevel too path, linear passes
(in approach or retract speed) may appear between the macros and the links
in RAPID speed. Those added passes are used to position the tool in a point
allowing an axial climb.
If you want to reduce those passes, use Start points to make the tool path
(thus the macros) start in an area that is not in undercut (if this is
possible).
Between Passes
If you set the
Between passes mode to Along tool axis and the
Clearance mode to Optimized, the tool will move in the
current plane, as far as possible, and not rise along the tool axis.
This tool path will consist of:
- a motion in retract speed,
- then a motion in high speed,
- then an approach motion.
This motion is collision free and does not take the Distance parameter of the optimized clearance into account.
If you want to ignore the optimized clearance in the Between passes, set the Between passes mode to Defined by Linking Approach/Retract.
Between Passes HSM macro
The Between passes HSM macro is made of at least:
-
an arc of circle motion for retract,
-
an arc of circle motion for approach,
-
a straight motion to link those two arc of circles.
In case of collision, two motions are added
-
a prolonged motion (with angle and distance parameters)
-
an axial motion (with a distance along tool axis parameter).
To modify the macro in case of collision, you must select Build by user and add the two motions manually.