The SmarTeam integrated menu provides two methods for saving Assemblies:
-
Save: Saves the assembly in the SmarTeam database. See Saving a Part for details.
-
Save As: Saves the assembly into the SmarTeam database and defines the project and the parent folder of the document.
For example, you can save the new assembly as a child of the Technical Assemblies folder in the Drive Shaft project.
After you choose a SmarTeam Save option, a CATIA Product Profile Card is displayed in the Object Attributes window. After you fill in the attribute fields, click OK. The assembly is saved to the SmarTeam database.
Note: When a CATIA document is saved for the first time to SmarTeam, the Project Manager window appears, allowing you to choose the SmarTeam project and parent folder to which the document will belong. The window is displayed once only during the Save transaction for the first saved document. This functionality is controlled by the option Save Documents > Choose SmarTeam project at first save.
![]() Although
it is possible to save different document types in the SmarTeam database
using SmarTeam Save Editor or Web Editor capabilities,
you must use CATIA SmarTeam > Save to save the different
CATIA documents in the database.
Although
it is possible to save different document types in the SmarTeam database
using SmarTeam Save Editor or Web Editor capabilities,
you must use CATIA SmarTeam > Save to save the different
CATIA documents in the database.
Since the process of saving a part is identical to that of saving an assembly, see the following pages for detailed instructions: To save a document for the first time, see Saving a Part for the First Time. To save a document for subsequent saves, see Saving a Part After Modifications.
This section discusses the following topics:
Saving the Components of an Assembly
When you save an assembly, SmarTeam - CATIA Integration automatically saves the components of the assembly as well:
-
If the components of the assembly are already saved into the SmarTeam database, then the Save option updates the Profile Cards for all the components to reflect any modifications that were made to the components as well as the hierarchical link between the assembly and its components.
-
If the components of the assembly are new and have not yet been saved to the SmarTeam database, then each of these components will be saved to SmarTeam one by one.
-
A Profile Card for each component is displayed. Fill in the Profile Cards, and click OK.
After each component is saved, a Profile Card for the assembly is displayed. -
Fill in the Profile Card.
-
Click OK.
Note: The SmarTeam - CATIA Integration saves all open documents in the CATIA session, even if the documents are not a part of the active assembly.
Using the Batch Mode
SmarTeam enables you to save the components of an assembly without displaying each Profile Card. This can save you a great deal of time. There are two methods for batch saving components:
-
Select SmarTeam > Batch Mode Save.
-
Save the assembly using the Save or Save As option.
SmarTeam saves all the components but does not display a Profile Card for each one.
Or
-
Select SmarTeam > Save As.
-
In the Save As window, click the Options tab to display the Save Option dialog box.
-
In the Save tab, check the checkboxes.
-
Click OK.
Document Content Exposure
When you save CATProduct documents, the associated internal components are by default exposed in the database:
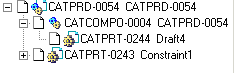 |
However, you can expose only the documents and their links as shown below:
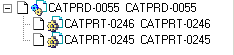 |
Only the administrator can make the necessary modifications using the System Configuration tool. For more information, see the SmarTeam documentation.