The assembly itself is typed in the Equipment Arrangement workbench. However, you can include parts from any Equipment and Systems 3D workbench, such as Piping Design or HVAC Design, Structures applications, and mechanical applications.
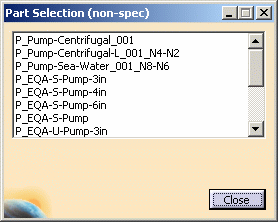
When you are placing the parts, you should note that the catalog may display parts that are already part of an assembly. You cannot place these individually, because they are part of an assembly. In the sample catalog provided with this application they are identified by the letters EQA, as seen in the image below. The letter 'S' after EQA means it is part of a standard assembly. The letter 'U' means it is unique. How they are identified depends on your own naming convention.
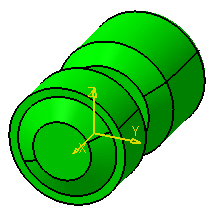
It is recommended that you place the main part - which is a pump in the example below - at the origin, or 0/0/0 coordinates.
- Open the Equipment Arrangement workbench.
- Click the Create Part button to display the Create Part dialog box.
- Click the Display Class Browser button, next to the Component Type field, and select Equipment Assembly in the Class Browser that displays. Select Standard or Unique Assembly in the Create Part dialog box. See below.
- Select the Product in the specifications tree.
- Enter a name for the assembly in the File Name field.
- Click Apply or OK. NOTE: These buttons will be grayed out until you select the Product.

- A Standard assembly is one in which the instances will point to the assembly reference saved in the catalog - all placed instances point to this reference.
- A Unique assembly is one in which a unique reference will be created each time you place an assembly.
You can change the type of an assembly. You should not change the type of a placed assembly - only change the reference.
- Click the Create Part button to display the Create Part dialog box.
- Select the assembly in the specifications tree or viewer.
- Click the Define Connectors button. The Manage Logical Publications dialog box displays.
- Select the connectors you want to publish in your assembly. They will be added to the Manage Logical Publications dialog box. Click Close to exit. NOTE: When you delete an assembly the publications are not deleted. You need to use the Manage Logical Publications dialog box to delete them.
- If you typed the assembly under the default type (or chapter) 'Equipment Assembly', then it will be added to the chapter to which the equipment in the assembly belongs. If, for instance, the assembly contains the equipment 'pump' then it will be added to the 'Pump' chapter. (If the equipment type does not exist in the catalog, then one will be created.) The type Equipment Assembly will not display in the catalog.
- If you created one or more sub-types (families) under the type (chapter) Equipment Assembly then the assembly will be added to the sub-type under which it was created. It will display in the catalog under the Equipment Assembly chapter and the sub-type, or family, under which it was created.
If Option 1 in Step 5 applies to your assembly then you need to do nothing. If Option 2 applies then you need to map it. Mapping links a function to physical parts. To do this, you need to map (in the functional physical mapping table) any 2D symbol that represents an assembly to the type 'Equipment Assembly', or to a sub-type. See the Feature Dictionary section for more information about mapping.
For assemblies, do not add a Client ID to the function name or physical part name in the table.
- You can add a "sub" assembly within an assembly. However, you should never modify the sub-assembly in any way - such as adding or deleting a component. If you need to modify anything within the sub-assembly then you should delete the sub-assembly, rebuild it, and add it again to the main assembly. In other words, the first level under an assembly can be modified, further levels should not be modified.
- You can create connectors on the members of an assembly, not on the assembly itself.
- You can have one part number for the assembly, but you will be able to use part numbers of its components in a bill of materials.
- Schematic driven parts placement of assemblies is possible.
- You can use one of the reporting functions provided with this application to run various reports on an assembly, such as determining the members of an assembly in a BOM.
![]()