You can also view a
history of the previous 5 local axis settings. A dialog box displays the
information when you click the Current Axis History button
![]() .
You can switch to one of these axes.
.
You can switch to one of these axes.
![]()
|
|
This task shows you how to create a temporary axis. It will allow you to create an axis at any location. | |
|
|
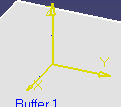
The current axis is the reference point by which elements are routed and placed. It is also the reference point from which an element's position is determined (as displayed in the X,Y,Z fields on the Definition dialog box for an element). When you create a temporary axis it allows you to place or manipulate resources with reference to that axis. | |
|
|
1. | Click the Item
Position button.
|
| 2. | Click at the location where you
want to place the temporary axis. This creates an axis at that location.
|
|
| 3. | Click the
Change current axis button
|
|
| 4. | You can also use the compass to define the plane for a temporary axis. To place a temporary axis at the compass base plane, first drag the compass to the plane where you want the axis. | |
|
|
You will have to
delete the temporary axes in the specifications tree when you no longer
need them. You can also view a
history of the previous 5 local axis settings. A dialog box displays the
information when you click the Current Axis History button
|
|
|
|
||