There are two types of Gantt chart supported in Process and Resource Definition. The normal Gantt chart is activity-centric and allows for overall cycle-time analysis for a set of activities. A resource-centric Gantt chart is also available for monitoring resources.
The Gantt chart visualization is based on either the specified or calculated cycle times defined for each activity. Any modifications made to the cycle time (whether made in the Gantt chart itself or on the PPR tree) are automatically reflected in the Gantt chart window.
-
To see the entire Gantt chart for a process, select the top process in the process list on the PPR tree. Otherwise, select a child operation to see only that portion of the process.
-
Click Open Gantt Chart
 .
An example is shown here:
.
An example is shown here:

Gantt Chart Properties
- To the right of each activity is a number of columns displaying selected activity properties. The number of columns displayed can be configured by the user. You can make other changes to the appearance of the Gantt chart by selecting the chart lines and dragging them to the desired size. Such changes remain from V5 session to V5 session.
- Activities may be directly selected in the Gantt chart. Any selected activity is simultaneously highlighted in the 3D inventory viewer and PERT chart.
- Right-click on an activity and select Properties to display the activity properties window.
The right frame provides a graphical representation of each process along the line of time, which also indicates the start, duration and end of each.
- When the option to compare the roll-up time of the parent is enabled, a parent activity will have two bars
in the right frame-a gray bar representing the specified cycle time, and a blue
or red summary bar, which represents
the roll-up times. The summary bar is normally blue, but becomes red if the roll-up time is
greater than or equal to the specified cycle time for the
parent:
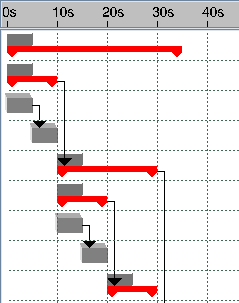
- Arrows pointing from the end of one activity to the beginning of another (as shown in the image above) indicate sequence links from one activity to another. Such sequence links can be created or deleted via the standard Link Activity command (see Basic Tasks > Editing a Process Plan > Linking Activities).
- When running a simulation, a dashed vertical line in the right window (called the Time Line), provides a visual indication of the current time during the execution of a process, and continuously updates its location according to the simulation or process verification clock. The Time Line will appear automatically when a simulation or process verification is launched.