 |
This procedure explains how to create or edit the motion
profile associated with a robot. All robots have profiles that make
up part of their controller data. The motion profile defines data
about the robot's speed. |
 |
To perform this procedure, you must have a robot loaded
in the PPR tree (a .CATProcess document). |
 |
-
From the Robot Controller toolbar, click
New Motion Profile  . .
-
Select the robot from the PPR tree.
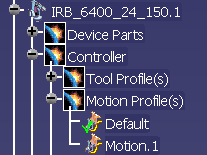
| A new motion profile appears under the controller node, which is
under the robot node, on the PPR tree (in the example, the new
motion profile is Motion.1; the current motion profile is the
default profile). |
 |
-
Right-click the new motion profile, and
select Motion Profile
object>Definition.
| The Motion Profile dialog box appears (the version
below is what is available after you select the More
button). |
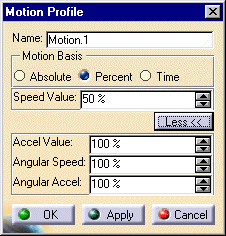 |
-
Enter the data that applies.
-
Select the OK button.
| The motion profile is now defined. |
|
 |
If you want the motion profile you just created and
defined set as the motion
profile for the robot, right-click the motion profile on the PPR tree,
and select Motion Profile object > Set as current. The green
check mark beside a particular profile indicates that it is set as current
(see the Default motion profile listed on the
image above). |
| |
Using Teach to Modify the Motion Profile
|
| |
In addition to the method described above, users
can modify the motion profile from the Table view of the
Teach dialog box by right-clicking on the operation and selecting
Motion Profile and then desired motion profile. The profiles
listed depend upon those defined for the robot, although the profile named
Current is always available. Current, in this
case, is defined as the profile from the previous operation that had a
profile defined. |
