In this section, you will find information about the main parameters you need for creating a hole:
This task shows you how to create a countersunk hole while constraining its location.-
Click Hole
 to create a hole in Part Design.
or click Hole to create a hole in Functional Molded Part.
 -
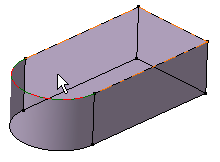
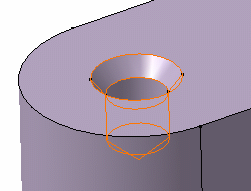
Select the circular edge and upper face as shown.
The application can now define one distance constraint to position the hole to be created. The hole will be concentric to the circular edge.The Hole Definition dialog box appears and the application previews the hole to be created. The Sketcher grid is displayed to help you create the hole.
Extensions
For the Hole Bottom
Whatever hole you choose, you need to specify the bottom limit you want. There is a variety of limits:
 |
 |
 |
| Blind | Up To Next | Up To Last |
 |
 |
|
| Up To Plane |
 |
- Contextual creation commands are available on the BOTTOM
text:
- Flat
- V bottom
- The Limit field is available if you set the Up To Plane or Up To Surface option.
- If you wish to use the Up To Plane or Up To Surface option, you can define an offset between the limit plane (or surface) and the bottom of the hole. For more information, see Up to Surface Pad in the Part Design User's Guide.
- The Up To next
limit is the first face the application detects while extruding the
profile, but this face must stops the whole extrusion. If only a portion
of extrusion is stopped, the hole passes through the material.
Preview
Result
For the Hole Top
The hole top is trimmed in two ways depending on whether the hole is created in a positive body or not.
- If you create a hole in a positive body, that is a body containing
material, the application always trims the top of the hole using the
Up To Next option. In other words, the next face encountered by the
hole limits the hole.
In this example, the hole encounters a fillet placed above the face initially selected. The application redefines the hole's top onto the fillet.
- If you create a hole in a negative body, that is a body containing no material or a body with a negative feature as its first feature, the application always trims the top of the hole using the Up to Plane option and the plane used is the sketch plane.
-
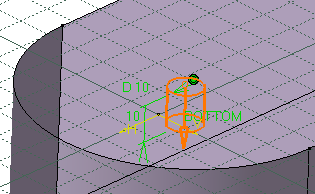
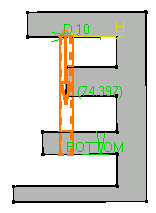
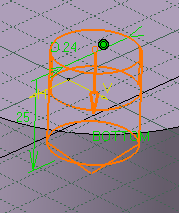
Now, define the hole you wish to create. Enter 24mm as the diameter value and 25mm as the depth value.
Hole Bottom
To define the shape of the hole's bottom, you can choose between three options:
- Flat: The hole is flat.
Even if the hole is of the Up To Surface or Up To Plane type, and even if an offset value is set from the target trimming element, the flat shape is never trimmed. The resulting geometry is therefore fully compliant with mechanical specifications.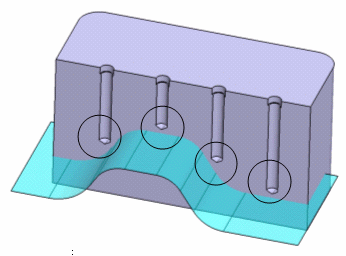
-
V-Bottom: The hole is
pointed. You just need to define how much it is pointed by specifying an
angle value.
Even if the hole is of the Up To Surface or Up To Plane type, and even if an offset value is set from the target trimming element, the V-bottom shape is never trimmed. The resulting geometry is therefore fully compliant with mechanical specifications.
-
Trimmed: This option can be used if the limit chosen for the
hole is of the Up To Next, Up To Last, Up To
Plane or
Up To Surface type. The plane or surface used as the limit,
trims the hole's bottom.
In case Up To Surface is chosen, the selected trimming surface must cover the hole cross-section at the hole's bottom completely, otherwise the feature cannot be created.
Note that hole features created with application releases release pre-R13 inherit the Trimmed option when necessary. In such cases, a warning message is issued by the application.
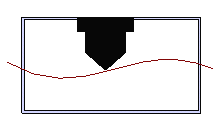
Example of a Counterbored Hole with a V-bottom Trimmed by a Surface (Section View)
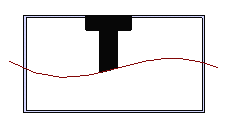
Example of a Counterbored Hole Trimmed by a Surface (Section View)

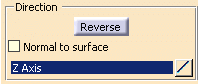
Direction
By default, the application creates the hole normal to the sketch face. But you can also define a creation direction not normal to the face by deselecting the Normal to surface option and selecting an edge or a line.
Contextual commands for creating the directions you need are available from the Direction field:
- Create Line: For more information, see Creating Lines
- Create Plane: For more information, see Creating Planes
- X Axis: the X axis of the current coordinate system origin (0,0,0) becomes the direction.
- Y Axis: the Y axis of the current coordinate system origin (0,0,0) becomes the direction.
- Z Axis: the Z axis of the current coordinate system origin (0,0,0) becomes the direction.
If you create any of these elements, the application then displays the line or the plane icon in front of the Direction field. Clicking this icon enables you to edit the element.
 |
-
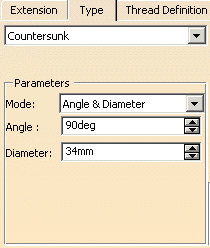
Click the Type tab to access the type of hole you wish to create. You are going to create a countersunk hole. If you choose to create that hole type,the countersink diameter must be greater than the hole diameter and the countersink angle must be greater than 0 and less than 180 degrees.
To create such a hole you need to choose two parameters of the following options:
- Depth & Angle
- Depth & Diameter
- Angle & Diameter
Set the Angle & Diameter parameters in the Mode field.
You will notice that the image assists you in defining the desired hole.

-
Enter 80deg in the Angle field.
The preview lets you see the new angle. -
Enter 35mm in the Diameter field.
The preview lets you see the new diameter. -
Click OK.
The hole is created. The specification tree indicates this creation. You will notice that the sketch used to create the hole also appears under the hole's name. This sketch consists of the point at the center of the hole.If working in the Functional Molded Part workbench, Hole.X is added to the specification tree in the FunctionalBody.X node. By default, as a protected feature, holes are in no show mode. To see the red protected area you have just created, set the Show mode.
Hole Types
Various shapes of standard holes can be created. These holes are :
 |
 |
 |
| Simple | Tapered | Counterbored |
 |
 |
| Countersunk | Counterdrilled |
When creating a...
- Tapered hole:
By default, the diameter value you specify for a tapered hole (Extension
tab) applies to the hole's bottom. In case you prefer to specify
the diameter value for the hole's upper part, select Top
in the Type tab, and then just enter the desired
value in the Extension tab.
Note that for Blind and Up To Holes, computed radius values applying to the hole bottom may lead to twisted geometry or auto crossing on profile. The application then generates a tapered hole with the shape of a simple hole. - Counterbored hole: The counterbore diameter must be greater than the hole diameter and the hole depth must be greater than the counterbore depth.
- Countersunk hole: The countersink diameter must be greater than the hole diameter and the countersink angle must be greater than 0 and less than 180 degrees.
- Counterdrilled hole: The counterdrill diameter must be greater than the hole diameter, the hole depth must be greater than the counter drill depth and the counterdrill angle must be greater than 0 and less than 180 degrees.
Threads
You can also define a threaded hole by clicking the Thread Definition tab and selecting the Threaded button to access the parameters you need to define.From V5R16 onward, it is possible to thread tapered holes.
Tolerancing Dimensions
You can define a tolerancing dimension for the hole
diameter just by clicking the icon
![]() to the right of the Diameter field. This capability displays the
Limit of Size Definition dialog box that enables you to choose
one method among four for defining your tolerance:
to the right of the Diameter field. This capability displays the
Limit of Size Definition dialog box that enables you to choose
one method among four for defining your tolerance:
-
General Tolerance: Sets a pre-defined tolerance class for angular sizes according to the standard selected for the session. By default, the general tolerance class is ISO 2768 - f.
-
Numerical values: Uses the values you enter to define the Upper Limit and optionally, the value of the Lower Limit field if you cleared the Symmetric Lower Limit option.
-
Tabulated values: Uses normative references.
-
Single limit: Enter a minimum or maximum value. The Delta/nominal option lets you enter a value in relation to the nominal diameter value. For example, if the nominal diameter value is 10 and if you enter 1, then the tolerance value will be 11.
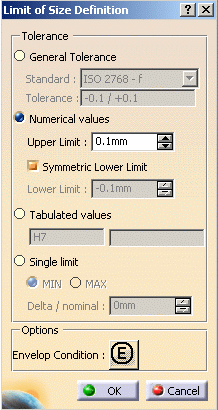
The Options area displays options directly
linked to the standard used in the application. To know or change that
normative reference, select Tools > Options > Mechanical Design >
Functional Tolerancing & Annotations, and in the Tolerancing
tab enter the new standard in the Default Standard at creation
option.
For more information, see the 3D Tolerancing and Annotations User's
Guide.
After you set a tolerancing dimension, the icon turns red:
![]() .
Toleranced holes
are identified by a specific icon in the specification tree.
.
Toleranced holes
are identified by a specific icon in the specification tree.
 |
Note that this capability is not available for countersunk and tapered holes and that a 3D Functional Tolerancing and Annotation license is required to be able to access this capability.
Methodology
Editing hole center points may sometimes take a long time. Whenever your design includes several holes in which center points need to be edited, we strongly recommend you define intermediate bodies on which you create the holes. Using intermediate bodies is a way of reducing the number of operations affected by the changes. Once intermediate bodies are created, just assemble them to the part.