Feature Modeling

  This page includes the following sections:

Introduction

Within the CAD world of surface modeling today, exist two traditional approaches to surface creation and modification. Freeform surfacing and parameter driven surfacing or explicit modeling and feature based modeling.
These two approaches have for a number of years been the industry standard for surface modeling, with the parametric (feature based) modeling being the more recent of the two. Each approach has its advantages and its disadvantages.
With free form (explicit) surface modeling, the user can quickly generate geometry without the need to maintain any history to how the geometry was created. Users have more control over the quality of the results, but modification to the geometry however is usually more cumbersome should the shape require a significant change (e. g. if fillet radii change from 5mm to 10mm). In most cases the user is required to start again.
With parametric (feature based) surface modeling, users create geometry from a number of inputs and parameters. These inputs could be curves and the parameters are usually components such as a length value or a radius value. The advantage here is that should one of the inputs or parameters require modification, the feature result does not lose its history. Thus rapid changes to geometry specifications can be achieved with minimum effort.
Modification to the aesthetical shape of a surface feature is very difficult in some cases, as it is very difficult to replicate an aesthetical design intent from a stylist through a few parameters. Which is why the explicit modeling approach remains the main solution today in achieving this requirement.
With these two approaches, many companies try to avoid mixing them during their design creation, as although each approach has its benefits, different users skills are required to work within the two worlds. Usually the more aesthetic surface shape creation is performed in the explicit world, and the more engineered surface creation is performed in the parametric world.
ICEM Shape Design introduces a new paradigm shift in surface modeling approaches by bringing these two worlds together by introducing the concept of Feature Modeling.
 

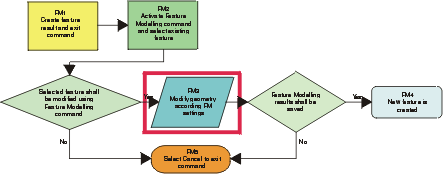
What do we mean by Feature Modeling?

  The 'Feature Modeling' concept within ISD enables users through an interactive method, the ability to modify the geometric element of the feature, whilst it continues to remain a Feature.
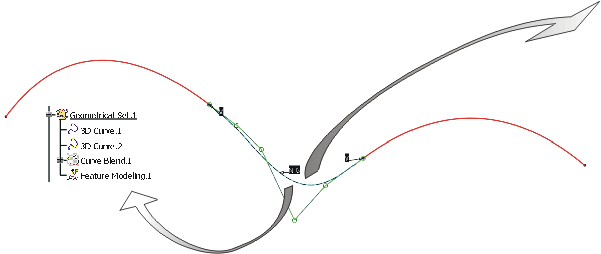
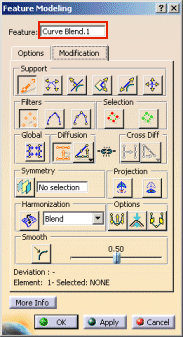
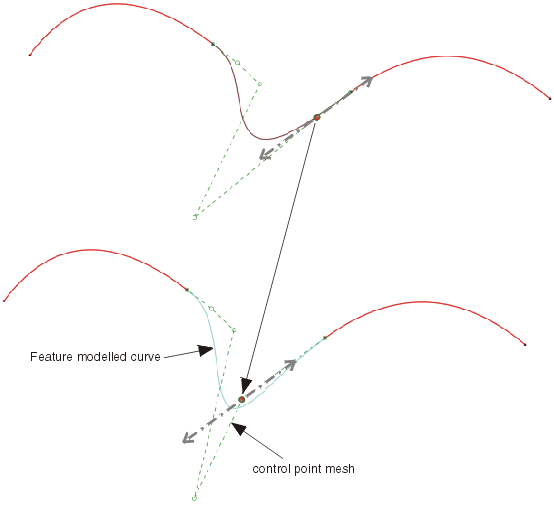
Users will still be able to create and modify the inputs and parameters of a feature result in the usual way, but now with the added advantage of being able to directly modify the geometry by its control points. i. e. explicit modeling.
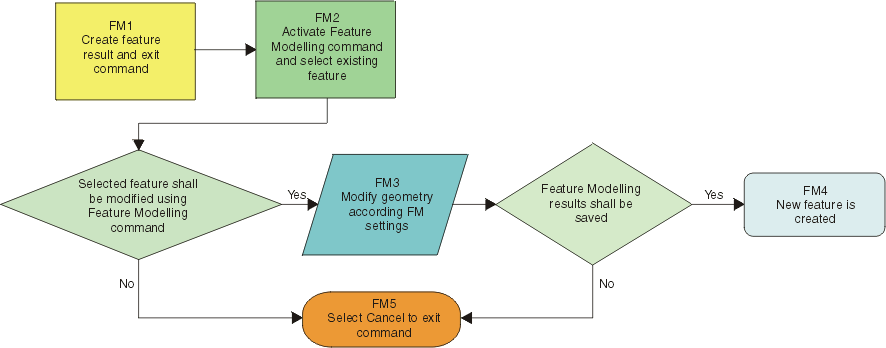
When a user wishes to perform ‚'Feature Modeling' on an existing geometric feature element, the general concept will lock or freeze the feature and any pre-defined parameters. Thus allowing the user to perform local control point modifications.
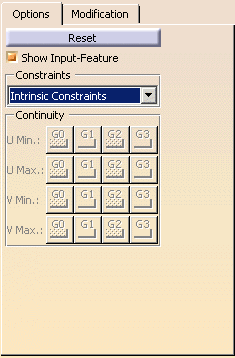
Depending upon the feature type, some parameters and manipulators are still offered to the user to allow them to continue making parameter driven modifications.
When modifications are complete, the feature is stored in the data model (CATPart) in the modified state.

Outline Concept

Due to the properties of its output data, the command Blend Curve is ideal for the Feature Modeling concept application.

The general process workflow and principle of how Feature modeling concept will work is outlined in the following workflow diagram.

Each stage of the Feature Modeling process has been labeled accordingly with an FM prefix. In the following, each stage is described in more detail. The Blend Curve command will be used as the reference command.

Key Stages

Open the FeatureModelling.CATPart document.
 

Feature Modeling Stage 1 (FM1)

Create feature result and exit command

 
  1. Create between 3D-Curve.1 and 3D-Curve.2 a blend curve using the command Blend Curve and close the dialog box 'Blend Curve'.


Feature Modeling Stage 2 (FM2)

Activate Feature Modelling command and select existing feature

  1. Click the Feature Modeling icon .
    The Feature Modeling dialog box is displayed.

 
  1. Select the element Blend Curve.1.

  2. In the dialog box Feature Modeling change to the 'Modification' tab.
    For Feature Modeling, the options of the command Control Points from the toolbar 'Shape Modification' are available.


Feature Modeling Stage 3 (FM3)

Modify geometry according FM settings
 
  1. Select the option 'Compass plane' and modify the middle control point.


Depending on the selected feature, the control point modification possibilities can be restricted to respect the constraints of the original element, e. g. continuities.
The element Blend Curve.1 in the example has been created with G2 continuity and an order of 6. In this case, the control points can only be moved along the control point mesh to respect the G2 continuity.


Feature Modeling Stage 4 (FM4)

New feature is created

 
  1. Click OK in the dialog box 'Feature Modeling' to create a new element Feature Modeling.1.
    The input feature Blend Curve.1 will be automatically set to No-show-Mode.


Feature Modeling Stage 5 (FM5)

Select Cancel to exit command

 
  1. Activate the dialog box 'Feature Modeling' with the current settings of the element Feature Modeling.1 by double-clicking onto the selected element.

  2. Modify again control points and close the dialog box with 'Cancel'.

The element Feature Modeling.1 is reset to the previous shape.

Options in the dialog box 'Feature Modeling'

You can define the following options:
  • Feature: Selection of the feature to be modified.
    Note:
    • Only one feature element can be selected.
    • Only a single cell feature element can be selected.
  Options tab
 
  • Reset: The original shape of the modified feature element is restored.
  • Show Input-Feature: The input feature can be blanked and unblanked.
  • Constraints: For the modification of the input geometry the following constraints can be specified:
    • No constraints: All control points except those with G0 continuity can be modified. The constraints defined for the original feature are overwritten.

    • Intrinsic Constraints: Control point manipulation is restricted to respect the constraints of the input feature.

    • Specified constraints: The constraints can be set manually using the options U/V Min and U/V Max.

  Modification tab
On this tab, the options of the command Control Points are available.
 
Note:
Depending on the selected feature, the control point modification possibilities can be restricted to respect the contraints of the original element, e. g. continuities.
  Click onto the 'More Info' button to display deviations.
 
  • Display: Depending on the options selected, values are displayed in the graphics area.
  • Deviation: During control point modification, the deviation from the input geometry can be displayed.

  • U+V: Display of the UV vectors of curves and surfaces.