 |
- The Machined Zone tab has been removed from the
machining strategy.
However:
- if you are working on a process created in a R8 release, with
values other than the default values,
the Machined Zone tab is displayed with the maximum slope that can be
considered to be horizontal
(any area that is considered to be horizontal will not be machined),
- If you are working on a process created in a R9 release or higher, the
slope parameters are managed by the
slope area.
|
|
|
The information in this section will help you create and edit Contour-driven
operations in your Manufacturing Program.
For all strategy types, click:
-
 to define
the geometry of the part to machine, to define
the geometry of the part to machine,
-
 to specify the
tool to use (you have the choice
of end mill to specify the
tool to use (you have the choice
of end mill
 or conical or conical
 tools for this
operation), tools for this
operation),
-
 to define the feedrates and spindle speeds, to define the feedrates and spindle speeds,
-
 to define transition paths in your machining operations by means of
NC macros as needed, to define transition paths in your machining operations by means of
NC macros as needed,
-
 to define strategy parameters: those parameters depend on the cycle type you
choose, as listed below.
to define strategy parameters: those parameters depend on the cycle type you
choose, as listed below.
By default, all those tabs are displayed with all their parameters.
However, most operations only require a reduced list of those
parameters.
-
Click <<Less button to display only those
parameters.
Whole tabs or only some parameters in a given tab will be hidden. They are
marked hidden in the table below.
-
Click More>> button to re-display all
parameters.
-
You can also use the modal option
User
Interface Simplified mode in the
Tools > Options > Machining > Operation tab.
-
Complete information on parameters common to all three
strategies is given in the Between Contours
section.
In the other two sections (Parallel contour and
Spine contour), you will find:
-
a list of the relevant parameters with a link to the
complete information,
-
information specific to that contour strategy.
- Below is a summary of those parameters:
|
|
Between
Contours:
In the machining strategy tab, use
- to define the
tool axis,
- to visualize the tool path style that you chose.
|
Parallel contour:
In the machining strategy tab, use
- to define the tool axis,
- to visualize the tool path style that you chose.
- the
3/5-Axis Converter option.
|
Spine
contour:
In the machining strategy tab, use
- to define the tool axis,
- to visualize the tool path style that you chose.
- the
3/5-Axis Converter option.
|
|
- the Machining tab to define:
- the Tool path style,
- the Machining tolerance,
- activate the Reverse tool path (hidden) and Max Discretization (hidden) with its
Step and Distribution mode) options.
|
- the Machining tab to define:
- the Tool path style,
- the Machining tolerance,
- activate the Reverse tool path (hidden) and Max Discretization
(hidden) with its Step
and Distribution mode options.
|
- Constant 2D (though
Max. distance between paths, Scallop height),
- Constant 3D or
Maximum 3D (through
Distance between paths, Sweeping strategy, Reference, Position, Offset),
- Via scallop height
(Max. distance between paths, Min. distance between paths, Scallop
height),
|
- the Radial tab to define:
- Constant 2D (though Max. distance between paths, Scallop height),
- Constant 3D (through Distance between paths),
- Via scallop height (through Maximum and Minimum distances between
paths, Scallop height),
- or activate the Along tool axis (hidden) or Other axis (hidden) options.
|
- the Radial tab to define:
- Constant 2D (though Max. distance between paths, Scallop height),
- Via scallop height (through Maximum and Minimum distances
between paths, Scallop height),
- or activate the Along tool axis (hidden) or Other axis (hidden) options.
|
|
- the Axial tab
(hidden) to define:
- the Multi-pass,
- the Number of levels,
- the Maximum cut depth,
- the Total depth.
|
- the Axial tab
(hidden) to define:
- the Multi-pass,
- the Number of levels,
- the Maximum cut depth,
- the Total depth.
|
|
|
- the Strategy tab is not available.
|
|
- to activate the Island skip or the Direct option,
- to define the Feedrate length.
|
- to activate the Island skip or the Direct option,
- to define the Feedrate length.
|
|
|
Contour-Driven: Geometry
You can specify the following geometry:
- Part with possible offset on part (double-click the
label).
- Check element with possible offset on check element
(double-click the label).
The check is often a clamp that holds the part and therefore is not an
area to be machined.
|
|
The tool path quality is improved along "between paths" if check
surfaces are selected. |
- Area to avoid (small
light brown corner near the part selection area).
This is in fact a list of faces removed from from the list
of faces built
from the Part.
Those removed faces are not taken into account to compute the tool path.
Use
Area to avoid for a quick definition of a sub-element of the
Part you
want to machine.
For example, you want to machine the Part below, but not
its pocket.
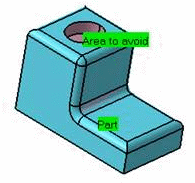
To do so:
- select the whole part as the Part,
- then define the Area to avoid by selecting the faces of the pocket.
A longer alternative would be to define the Part face by
face.
- Safety plane. The safety plane is the plane that the tool
will rise to at the end of the tool path in order
to avoid collisions with the part. The safety plane contextual menu allows
you to define:
- an offset safety plane at a distance that you give in a dialog box
that is displayed.
The new plane will be offset from the original by the distance that you
enter in the dialog box along the normal
to the safety plane.
If the safety plane normal and the tool axis have opposed directions,
the direction of the safety plane normal
is inverted to ensure that the safety plane is not inside the part to
machine
- and the tool retract mode which may be either normal to the safety
plane or normal to the tool axis.
- Top plane which defines the highest plane that will be
machined on the part,
- Bottom plane which defines the lowest plane that will be
machined on the part,
- Limiting contour which defines the machining limit on the
part.
The contour that defines the outer machining limit on the part.
You can also use the
Part Autolimit option, with the Side to machine,
Stop position, Stop mode and Offset parameters.
|
|
|
- Guide contours, Stop contours and Island
contours (only used for
machining with parallel
contours) are defined
within the Guiding strategy.
See also Defining the
Guide in Parallel Contour Mode.
- The picture is slightly different if you are using a rework area and
will have fewer parameters.
When using a rework area,
please remember to use a smaller tool than the one defined the rework area
as
this is necessary to ensure the generation of a tool path inside it.
|
| |
Subset
If you are editing a rework, an additional information is displayed,
indicating which type of subset you are working on.
This field is not editable (you can not go from one subset to another).
Info
When pressed, gives the details on the parameters that were defined with
the rework area.
Please refer to the
Basic
Task - Selecting Geometric Components to learn how to select the
geometry.

Appears when invalid faces have been detected.
This message disappears when you close the dialog box or when the next
computation is successful.
Appears when invalid faces have been detected and when you have decided
to ignore them.
This message remains displayed as a warning.
Click the text to switch from one status to the other. |
 |
|
 |
|
|
|
|
