This section deals with specific creation and customization
tasks to be performed before starting SPE installation:
-
Creating a Predefined Comments File (optional)
Creating a shared rules CATProduct
document
-
Create a CATProduct document containing the clash rules to be used for the interference analysis. For more detailed information, please read Knowledgeware Clash Rules
-
This CATProduct document must be located in a shared directory accessible from the SPE server user (Apache User), the spatial Index process user and all CATIA client users.
(Optional) Creating a Predefined
Comments file (.txt)
-
Create a txt file in which CATIA client comments are to be stored. This .txt file should contain a comment per line.
|
|
Notes:
|
Creating CGR Repository
Create the CGR repository ('directory' where the tested cgr are to be written) for this:
Recommendations
-
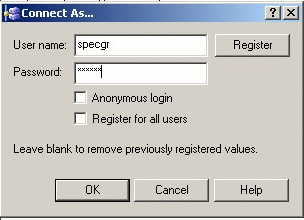
When working with both UNIX and Windows machines, the best way to handle this, is to create shared directories on a Unix server and map them as network drives on Windows machines with the NFS Client. We recommend you to declare a specific Unix user (for instance, specgr) to access a Unix directory in which will be located the following:
-
CGR repository,
-
Predefined Comments file,
-
Clash Rules CATProduct document,
-
Output results files.
-
This directory must be a network shared directory.
Each and every client and server machines must have full access to this
directory. To do so, you can use any NFS mapping tool.
In our example we specified the following directory:
\\auro1dsy\/SHARED/SPE mapped on Y drive on each windows machine.
-
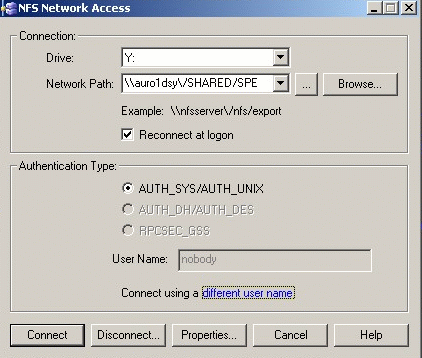
Read the procedure example below (when using NFS):
-
Select Start > Programs > NFS Maestro > NFS Network Access...
The NFS Network Access dialog box is displayed: -
Enter the appropriate network path.
|
|
|
|
|
|
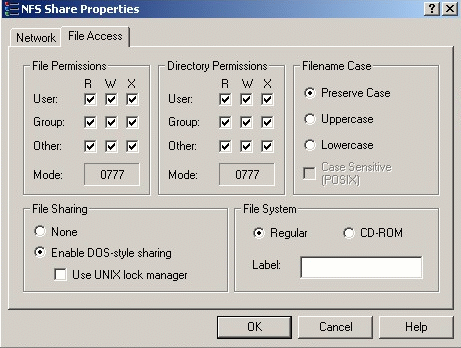
You now need to give full permissions to this CGR repository. All you need to do is:
|
|
|
Later, in the installation procedure, you are going to
specify
SPACE_ENG_SERVER_REPOSITORY and
SPACE_ENG_CLIENT_REPOSITORY variables referring to this directory
respectively on the server and on the client.
System Users' Setup
-
Declare a specific user for the SpE server.
-
This user must have the appropriate privileges:
-
administrator rights on the SpE server machine,
-
read access rights on the above-mentioned shared file (CATProduct document containing clash rules) and directories.

If you plan to use several spatial indexes (for several PRCs) on several machines different from the SpE server, create several users who should have read access rights on the shared directories for running those servers.
-
ENOVIA Users' Setup
SPE needs to download any part instance from the ENOVIA database,
therefore, you need to:
-
Declare an administrator user in ENOVIA P&O to enable the SpE server and spatial indexes ENOVIA connection (you can use the same administrator user for all servers).
|
|
For more information, refer to the appropriate ENOVIA documentations:
|
Customizing the Apache HTTP Server on
Windows
![]()
This procedure explains how to customize the Apache server on an Windows workstation.
Note: the host site can either be a Windows or UNIX workstation
![]()
Before customizing the Apache server, you should have
installed the Apache server on your Windows server, following the
installation procedure to be found at the following address:
http://www.apache.org/
The server is installed (if you used the default location)
in the folder:
C:\Program Files\Apache Group\
Also refer to Detailed Installation Prerequisites to check you have all the hardware and software prerequisites.
Note: It is recommended to install Apache as a service, if you do not want to launch it manually at each logon.
To check Apache installation is complete and the Apache
server is running, try to connect to http://name_of_machine using an
internet browser.
For more detailed information, read
Step 6: Checking Network Communications
-
Logon as root. When done, customize the
httpd.conffile as follows: -
In the Apache Configuration directory (for example located as follows:
C:\Program files\Apache
       Group\Apache\conf
) -
Comment the following line (corresponding to the default ScriptAlias/cgi-bin path):
#ScriptAlias /cgi-bin/ "C:/Program Files/Apache
           Group/Apache/cgi-bin/"
ScriptAlias controls which directories contain server scripts.
-
Add the following line (default ScriptAlias/cgi-bin path):
           ScriptAlias /cgi-bin/ "C:/Program
           Files/Dassault Systemes/B17/intel_a/code/bin/"
Of course, the path should be changed to whatever your ScriptAliased
-
Add to the
httpd.conffile, the following lines (security directives for Apache):<Directory "C:/Program Files/Dassault Systemes/B17/intel_a/code/bin">>
AllowOverride None
Options None
</Directory -
Start or restart Apache service.
![]()
Note: the green lines are to be modified accordingly (i.e. With the correct path, we specified here the default installation path).
![]()


