|
|
This procedure describes how to measure a plane feature. A plane feature measure will appear as an activity of the process on the PPR tree. | |||||||
|
|
To measure a plane feature, you must have a product loaded and a plane defined. | |||||||
|
|
|
|||||||
|
|
If you create this activity before you insert a CMM into the resource list of the PPR tree, you will be asked to confirm that you wish to create the activity without a CMM assigned to it. You can assign the CMM to all the activities within the process once you are ready to insert the CMM. | |||||||
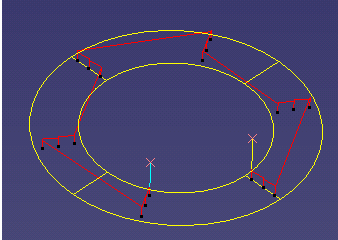
| For a circular plane, the measurement path is not a grid, but runs between the circles created by the minimum and maximum diameters specified. | ||||||||
 |
||||||||
| When you select enable material check, the points selected for measurement will all touch the material; none will occur in space. |

![]()