In drafting terminology, the curved surface of an outside corner is generally called a round and that of an inside corner is normally referred to as a fillet.
Edge fillets are smooth transitional surfaces between two adjacent faces.
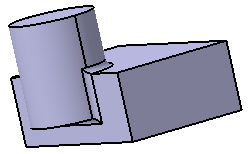
The purpose of this task is to fillet several edges. First you will fillet nine edges, then you will fillet a face and trim this fillet to a plane. The cases illustrated here are simple. They use a constant radius: the same radius value is applied to the entire edges. To see more complex fillets, refer to Creating Variable Radius Fillets or Variable Radius Fillet Using a Spine.
This document deals with the following:
Open the Edge_Fillet1.CATPart document.
How to Fillet Edges
-
Click Edge Fillet
 in the Dress-Up Features toolbar (Fillets
sub-toolbar).
in the Dress-Up Features toolbar (Fillets
sub-toolbar).
The Edge Fillet Definition dialog box appears.
-
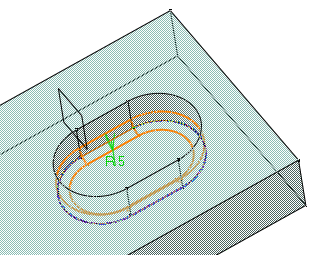
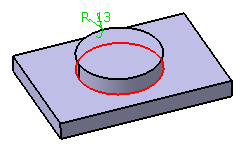
Select the edge as shown. The edge selected then appears in the Object(s) to fillet field. The application displays the radius value. Clicking Preview previews the fillet to be created.

-
Select the Selection mode as Tangency.
The preview clearly shows that the whole edge will be filleted.
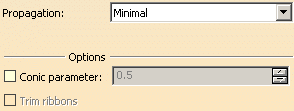
If you set the Tangency mode, the Trim ribbons option becomes available: you can then trim the fillets to be created. For more, refer to Trimming ribbons.
The Selection mode available are:
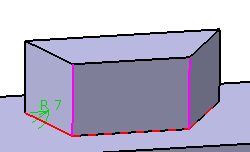
- Minimal: Edges tangent to selected edges can be
taken into account to some extent. The application continues
filleting beyond the selected edge whenever it cannot do otherwise.
In our example below, the fillet is computed on the selected edge
and on a portion of tangent edges:

- Tangency: Tangencies are taken into account so as to
fillet the entire edge and possible tangent edges.
- Intersection:
This selection mode fillets all the edges created by the
intersection of the faces of the selected objects and the rest
of the faces of the current body. This mode is based on the selection of features, while the other
selection modes Minimal and Tangency are
based on the selection of edges or faces.
For more information, see
Filleting Intersection Edges.
-
Enter 15mm as the new radius value. The radius value is updated in the geometry area.
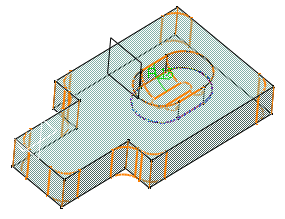
-
Select the eight vertical edges.
-
Click OK.
The edges are filleted. The creation of this fillet is indicated in the specification tree.
-
Click Edge Fillet
again and select the upper face as the new element to be filleted. -
Enter 5mm as the radius value.
-
Click More to access four additional options.

- the Edges to keep option, refer to Keeping Edges.
- the Blend corner(s) option, refer to Reshaping Corners.
Limiting Elements
-
Click the Limiting element field and select Plane.1 as the plane that will intersect the fillet.
An arrow appears on the plane to indicate the portion of material that will be kept. Clicking this arrow reverses the direction and therefore indicates that the portion of material that will be kept will be the opposite one.
This capability is supported on Part Design P2 only.
- It is possible to use one or more limiting elements.
- Contextual commands creating the
limiting elements you need are available from the Limiting
elements field:
- Create Point: For more information, see Creating Points
- Create Midpoint: creates the midpoint of the line you select
- Create Endpoint: creates the endpoint of the line you select
- Create Plane: see Creating Planes
- XY Plane: the XY plane of the current coordinate system origin (0,0,0) becomes the limiting element.
- YZ Plane: the YZ plane of the current coordinate system origin (0,0,0) becomes the limiting element.
- ZX Plane: the ZX plane of the current coordinate system origin (0,0,0) becomes the limiting element.
- Create Intersection: Creating Intersections
- Create Projection: see Creating Projections
- Create Join: joins surfaces or curves. See Joining Surfaces or Curves.
- Create Extrapol: extrapolates surface boundaries or curves. See Extrapolating Surfaces and Extrapolating Curves.
If you create any of these elements, the application then displays the corresponding icon in front of the Limiting element(s) field. Clicking this icon enables you to edit the element.
-
You can create limiting elements just by clicking on the edge to be filleted. The application displays this element as a blue disk:
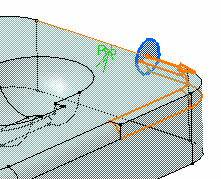
- You can select points as limiting
elements. These points must be located on the edge to be filleted
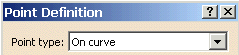
and they must have been created using the On curve
option available in the Point Definition dialog box.
-
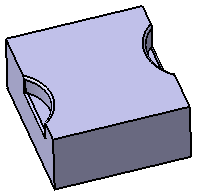
Click OK.
The second fillet is trimmed to Plane.1. Both fillets are displayed in the specification tree. The final part looks like this:
For a parameter comprised between or equal to:
- 0.5, the resulting curve is a parabola.
- 0 < parameter < 0.5, the resulting curve is an arc of an ellipse.
- 0.5 < parameter < 1, the resulting curve is a hyperbola.
- If the conic mode is activated, the Edge(s) to keep and the Parting element fields cannot be selected. The Conic parameter option is not available when a parting element is already defined or the edge to keep is either explicit or implicit in nature.
- Conical fillets do not handle twist configurations. If a
twist is detected, the fillet
operation fails.
- If the
fillet surface curvature is lower than the support
curvature, fillet surface
relimitation may fail. In this case decrease the Conic parameter. - The Parting Element option is grayed out, when the CFO license is not available.
Filleting Intersection Edges
Filleting intersection edges capability allows you to fillet edges in a more productive way by reducing the number of selections.
Select the Intersection option from the Selection mode field in the Edge Fillet Definition dialog box. Now if you select any part design feature, all the sharp edges at the intersection of this feature with the current solid are automatically filleted with the given radius value. You can select one or more features at a time. The selected feature appears in the Object(s) to fillet field and the other feature becomes a current solid.
 |
 |
| Feature selection showing all edges at the intersection |
Intersection Fillet |
- The selection of a body used in a Boolean operation is not
allowed. In order to get the intersection edges of an operated body, you
need to select the corresponding Boolean operation or one of its
features. This selection must be done from the specification tree only.
To get the intersection edges of an operated body (Body.2), select Assemble.1 created from a boolean operation. You can also directly select the features (Pocket.1 and Pocket.2) of this body.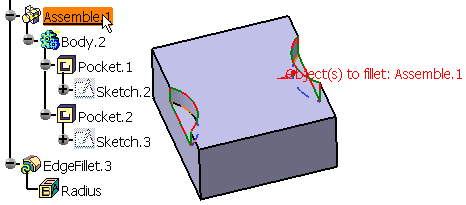
- If a pattern is selected, only the instances of the pattern are filleted. So it is necessary to add the parent shape of the pattern to the list of objects to be filleted.
- If you have selected edges in Tangency or Minimal mode, you can change the Selection mode to Intersection. In this case selection is cleared and Candidate features dialog box appears which gives you option to select the features that contains these edges. The selected feature appears in the Object(s) to fillet field.
- The Blend corner(s) option is not available with the Intersection selection mode.
- This capability takes into account the tangency of the edges to be filleted.
Interrupting Fillet Computations
In case you made a mistake when
defining a fillet (wrong radius value for example), you can interrupt the
feature computation launched after clicking OK, when the
computation requires a few seconds to perform.
In concrete terms, if the computation exceeds a certain amount of time, a
window appears providing a Cancel option. To interrupt the
operation, just click that Cancel button. This interrupts the
process and then displays an Update Diagnosis dialog box enabling you to
edit, deactivate, isolate or even delete the feature.
This new capability is available for any types of fillet features you are creating or editing.
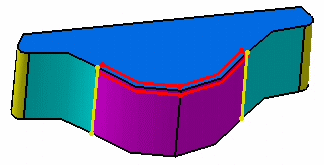
Keeping Edges
When filleting an edge, depending on the radius value you specified the fillet may affect other edges of the part that you do not want to fillet. In case you can anticipate such a result, before confirming the Fillet operation, specify the edges you want to exclude from the operation by filling in the Edges to keep field.
In the example below, the user selects the upper edge as the edge to keep. Once selected, this edge turns purple.
| Edge to be filleted |
 |
| The upper edge is selected as the edge to be kept | 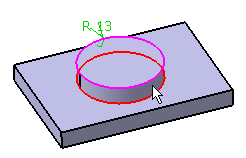 |
| The upper edge is not
filleted
|
 |
In the example below, both pink colored edges are selected as edges to be kept. The selection of the edge to be filleted (in red) then includes two additional edges.
|
Selection of the edge to fillet and of two edges to be kept |
 |
|
Result |
 |
If an Error Message is Issued...
In case you have specified no edges you want to exclude from the fillet operation, the application may sometimes detect that some edges cause trouble during the fillet computation. The application then issues an error message asking you if you wish to select the edges you do not want to fillet.
There are two ways of specifying the edges you want to keep:
- By explicitly specifying these edges
This means that you need to click Yes in the Feature Definition Error dialog box. Then you just need to click the Edit button from the Update Diagnosis dialog box that appears, click the Edges to keep field from the Edge Fillet dialog box and select the edge in the geometry. The application then displays the selected edge in pink meaning that the edge will not be affected by the fillet operation. The fillet is eventually computed and does not affect the "keep" edge. - By letting the application find a solution
If you do not wish to explicitly select the edge you do not want to fillet, just click No in the Feature Definition Error dialog box. The application then tries to find a solution.
Both methods may not give the same result depending on the geometry. If you prefer to let the application find a solution, the application finds an appropriate physical edge in the geometry, then considers it as the edge to be kept. If no edge can be found, then it finds a solution by itself.
Ignoring Edges
When the update process detects that sharp edges (edges are considered as sharp when the angle between the two faces is greater than 0.5 deg) interrupt fillet operations, it is possible to continue filleting just by selecting an edge adjacent to the edge to be filleted. In the example below, the application displays the edge causing trouble in yellow:

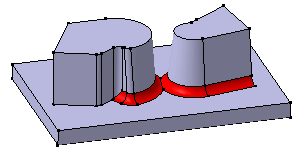
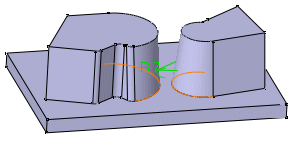
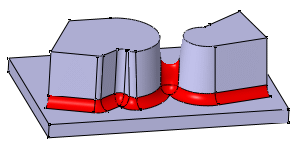
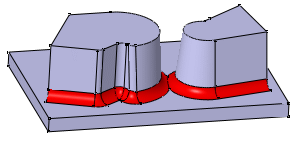
Trimming Ribbons
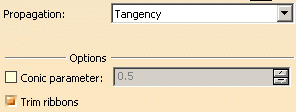
If you choose to use the Tangency propagation mode, you can also trim overlapping fillets. To do so, simply check the "Trim ribbons" option.
Selected edges
 |
Overlapping fillets are not trimmed
 |
Both fillets are trimmed
 |
|
Compare the above results to the fillets created with the Minimal propagation mode: The fillets are only trimmed.
 |
|