Managing Job Files
This section describes how you use the Storage Manager to view or delete the files that are associated with a particular job. The following topics are covered:
Understanding the Files Generated by Analyzing a Model in Abaqus
When you submit a job for analysis, Abaqus creates a set of files. The following list describes some of the files that Abaqus creates and their relationship to Nonlinear Structural Analysis and Thermal Analysis:
Output database files (job_name.odb)
Output database files contain the results from your analysis. An output database file is associated with the job you submit; for example, if you named your job FrictionLoad, the analysis creates an output database file called FrictionLoad.odb. You cannot modify the contents of the output database file once it has been created.
When you attach an output database file to an analysis document, Nonlinear Structural Analysis or Thermal Analysis allows you to view graphical representations of the contents. You can attach an output database file that is associated with the current analysis or one that is associated with an orphan mesh. See Viewing the Results of Your Job and Accessing Results for more information.
The output database lock file (job_name.lck)
The lock file (job_name.lck) is written whenever an output database file is opened with write access, including when an analysis is running and writing output to an output database file. The lock file prevents you from having simultaneous write permission to the output database from multiple sources. It is deleted automatically when the output database file is closed or when the analysis that creates it ends.
The data file (job_name.dat)
The data file contains printed output from the analysis input file processor, as well as printed output of selected results written during the analysis. Nonlinear Structural Analysis or Thermal Analysis automatically requests that the default printed output for the current analysis procedure be generated at the end of each step; you cannot use Nonlinear Structural Analysis or Thermal Analysis to control the contents of the data file.
The message file (job_name.msg)
The message file contains diagnostic or informative messages about the progress of the solution.
The status file (job_name.sta)
The status file (job_name.sta) contains information about the progress of the analysis.
The results file (job_name.fil)
The results file contains selected results from the analysis in a format that can be read by other applications, such as postprocessing programs. Thermal Analysis creates a results file only for a thermal analysis, so that the temperatures can be read into a subsequent mechanical analysis. Nonlinear Structural Analysis can also read the temperature results from the output database file.
The interprocess message file (job_name.ipm)
The interprocess message file contains a log of all messages sent from the solver to Nonlinear Structural Analysis or Thermal Analysis.
Note: The errors and warnings that Abaqus writes to the data, message, and status files while analyzing a job can be monitored using the job monitor dialog box or the job diagnostics tool; for more information, see Monitoring the Progress of a Job and Displaying Job Diagnostics.
 Viewing or Deleting
Job Files
Viewing or Deleting
Job Files
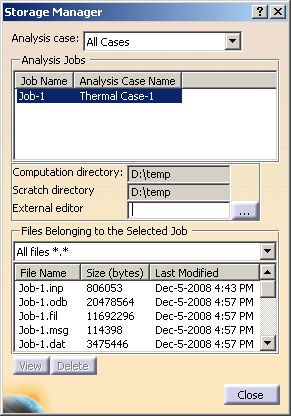
The Storage Manager allows you to do the following:
-
List the job files created for a particular analysis case or for all analysis cases.
-
View a particular job file in the external text editor of your choice.
-
Delete selected job files from the storage directories.
![]() This task shows you how to use the
Storage
Manager to view or delete the files
created for a job. You can also delete a job by
right-clicking on the job object in the
specification tree and selecting Delete.
This task shows you how to use the
Storage
Manager to view or delete the files
created for a job. You can also delete a job by
right-clicking on the job object in the
specification tree and selecting Delete.
-
Click the Storage Manager icon
 .
.The Storage Manager dialog box appears.
-
Select the analysis case or cases for which you want to view job files from the drop-down menu at the top of the Storage Manager dialog box. You can view job files for a particular analysis case or for all analysis cases.
The list of jobs is updated to show the jobs that you have created for the selected analysis case or cases. The job name and the analysis case with which it is associated are displayed.
-
Select a job from the list of Analysis Jobs.
The remaining information in the Storage Manager dialog box is updated to show the information for the selected job.
-
The Computation directory and Scratch directory fields display the paths to the directories where computation and temporary scratch data, respectively, are stored for the selected job. These fields are for informational purposes only and cannot be edited in the Storage Manager; see Specifying File Storage Directories for information on modifying these paths.
-
The External editor option provides the path to the external editor used for viewing job text files (for example, xemacs or notepad). The default editor is that specified in the Options dialog box (Configuring an Abaqus Analysis). To specify a different editor, you can do one of the following:
-
Click in the External editor text field, and type the path to the editor.
-
Click ... to display the External Text Editor dialog box, and select the editor of your choice.
-
-
Select the type of job files that you wish to list from the drop-down menu beneath Files Belonging to the Selected Job. You can list all the files associated with the selected job, or you can filter the list according to file extension. See Understanding the Files Generated by Analyzing a Model in Abaqus for an explanation of the files associated with a job.
The list of job files is updated to reflect your selection. The file name and the file size (in bytes) is displayed.
-
To view a text file in an external editor, select a text file from the list of job files, and click View. Only data (.dat), log (.log), message (.msg), and status (.sta) files can be viewed.
The selected file is displayed in the text editor specified in the External editor field.
-
To delete a job file, select a file from the list of job files, and click Delete.
A dialog box appears, asking you to confirm that you wish to delete the selected file. Click OK to delete the file.
-
Click Close to close the Storage Manager dialog box.